
|
The world of non-commercial film and A-V |
Events Diary | Search | ||
| The Film and Video Institute | | ||||
The Videomaker's Journey: part three |
This is further advice - not for beginners.
Contents
- A directional microphone on a boom
- Headphones plugged into the video camera
- Lights
- Filters
- Reflectors
- Wide angle lens adaptors
Col and I make movies under the banner of "Threadbare Movies". We do not spend much money on moviemaking - some movies are zero cost - others have A$20 to A$50 spent on props and clothes from the thrift shops. It is a question of writing the right stories. The actors usually provide their own clothes - they are wonderful with the way they help us - and their acting is always very good.
Before proceeding to buy this equipment, you should make at least two dramas using the microphone that is built into your camcorder and using reading lamps to provide additional light. You need to be sure you really want to do this work, before spending more money. A lot of home movies are made without any of the gear described below, but once you are competent at movie making you can improve your movies by using some of the equipment. The microphone on a boom is used by the minority of home movie makers but we wouldn't be without it. We get very good audio, even in very noisy environments.
All of the stuff I mention here is sensible - but remember it is not essential. You might not use some of it very much, but when you learn how to use it properly, it does enhance your enjoyment of the craft.
The wide-angle lens adaptor is definitely not essential but it is the most popular accessory owned by the home movie maker - a good one is very expensive.
Warning. If you accidently feed "line level audio" into a microphone socket - ie. audio from a cassette player, VCR, TV, DVD player etc. - you will blow something up - either your ears or your camcorder or other equipment. Refer to Part 17 (Theory and Practice of Editing) where you will learn how to handle the different strengths of audio.
A directional microphone on a boom.
How to record good quality audio.
- Reflected and direct unwanted sound is the problem to avoid. A directional microphone on a boom - close to the actors, and aimed at the actors will eliminate or considerably reduce unwanted sound.
- Also the actors must project their voices - they must speak loudly. Digital video cameras handle loud dialogue with ease and without distortion. When editing the movie the dialogue is brought down to zero db level - the background noise then drops out completely or is reduced to a very low acceptable level.
- Headphones must be turned up to a very high level (about 50% maximum volume, but only if you are sure that, there will be no sudden loud noises in the area that will cause ear damage). If we hear unwanted sound or if the dialogue isn't clearly heard - we promptly fix the situation.
- Tugging on the cables will break them at the connections. The sockets in the video camera can also be damaged. We have experienced all these problems - we made the first two movies ok, then we had three breakdowns in the next movie.
- When in use do not shake the microphone, or the boom or the cable - this will create severe static in the audio. Do not let the microphone or the boom touch a building or other structure - a wall-clock ticking can be heard, even when it is several rooms away.
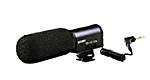 The microphone.
It is not essential to have a shotgun microphone - you can use a Sony ECM-Z157 microphone or similar on a boom, it has a similar performance to the microphones built into the cameras. While this will not eliminate background noise, it will reduce it by a useful amount - it is the equivalent of getting the camcorder in close - and there is a switch on the microphone so that you can adjust the volume.
[That mic is not available now. In the UK an equivalent would be the Sony ECM-MSD1 which in mid 2007 is available from Jessops for £80.]
The aiming of this microphone is not critical, but the boom holder or the camcorder operator should have headphones so as to monitor the audio. Hard floors, walls and ceilings will reflect the sound; having the actors standing on grass, soil or carpets will help reduce the background noise. A room with curtains, carpet and soft furnishings will slightly reduce background noise.
If you can afford it, the small Senheisser shotgun microphone is one of the
best to mount on a boom. Even when it is mounted on the camcorder - it works
very well, both indoors and outdoors - when there is only a moderate amount
of background noise.
[The Sennheiser ME66 costs around £243 in UK
in mid 2007 but you will need a K6 or K6P powering module which nearly doubles
the price.]
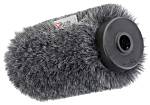 The microphone on a boom will need a wind muff when outdoors
in windy weather. Make a sleeve to fit over the microphone from cloth that
has thick fake fur on the outside. The fur hairs should be 25 mm
long.
The microphone on a boom will need a wind muff when outdoors
in windy weather. Make a sleeve to fit over the microphone from cloth that
has thick fake fur on the outside. The fur hairs should be 25 mm
long.
[In the UK a major supplier of wind s is
Rycote, whose "Softie Windshield" is
illustrated.]
Microphone cables.
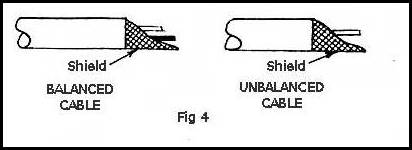
Semi-professional and professional camcorders have three pin (XLR type) sockets. They connect to balanced microphone cables - which are mono cables - they are not stereo cables. This article will show you how to use other type connections with balanced microphone cables. Hi fi stores sell expensive short thick cables used for connecting domestic equipment when processing analogue video through VCR's, TV's, DVD recorders, video cameras, audio and video processors. These are balanced cables, soldered to unbalanced connectors.
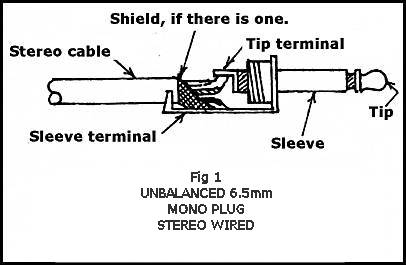
An unbalanced microphone cable has a single conductor wire surrounded by a fine-wire mesh shield. These cables can have 6.5 mm or 3.5 mm connectors. We have managed to use such a cable, but with some problems. A balanced cable with a stronger link to the connectors would be better, see figures.1,2,4.
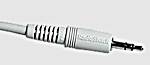
[Note: the names used for plugs varies. In UK the
6.5mm is often still called "a quarter-inch (¼") jack plug". The term
"phone plug" is used in some parts of the world for the miniature versions
of the ¼" jack plug. The term "phono" is used for all sorts of miniature
audio connectors but strictly-speaking refers to RCA-designed plugs. Unless
otherwise specified this article refers to the miniature type of 3.5mm plug
shown in the centre of the display below:]
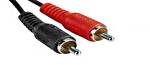 |
 |
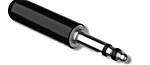 |
| RCA plugs | 3.5mm miniature plugs |
6.5mm (¼") jack plug |
A balanced microphone cable has two conductor wires, surrounded by a fine-wire mesh shield.
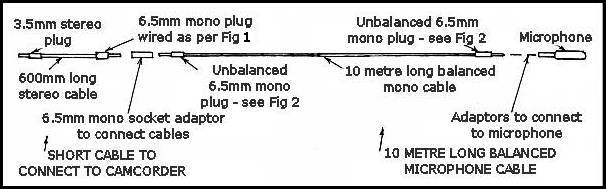
Fig.2 shows how to connect the cable to an unbalanced 6.5 mm plug - so that it can be used with unbalanced equipment. The fine-wire mesh shield keeps out electrostatic hum and also provides a strong connection to the plug, which will be resistant to breakage.
Make the cable 10 metres long - with connections at the ends to suit the equipment in use. At the camcorder end - normally have a 6.5 mm plug as shown in fig.2. Refer to short cables, for details of connections to the camcorder.
Short cables to connect the microphone cable and headphone cable to the camcorder.
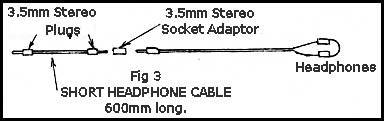
| Fig 1:
These cables should be 600 mm long. The centre of the cables are to be securely clamped to the tripod. Unbalanced cables will be fine. The microphone short cable is to have a 3.5 mm stereo plug at the camera end . The other end has a 6.5 mm mono socket or plug - but the two hot wires for left and right stereo are soldered to the tip terminal as shown. The average handyman will have problems trying to solder the cable to the 3.5 mm stereo plug. Buy a stereo cable about 1.2 metres long with 3.5 mm stereo plugs at both ends. Cut it into two pieces and solder them to 6.5 mm unbalanced mono plugs (stereo wired) as shown on fig.1. You now have two cables - one is a spare. |
 |
 |
 |
A stereo adapter socket connects 6.5mm plug to 6.5mm plug and thus joins the short cable to the long cable. You cannot get a mono adapter - the stereo adapter will work OK.
| Fig 3:
The headphone cable should have a 3.5 mm stereo plugs at both ends - use a socket adapter to connect the short cable to the long cable. |
 |
The microphone boom should be 2.7 metres long.
Make it from a telescopic golf ball retriever or a two piece fishing rod or a painter's two piece aluminium extension handle. Buy or make a fitting to hold the microphone - it must be able to tilt to any angle. If you use a fishing rod, the top half is too flexible, so you need to stiffen it with aluminium tube.
Small soldering iron and resin corded solder - used to repair damaged cables.
Tripod for boom, if you want to make movies without a crew.
When indoors - you can manage with the camera's inbuilt microphone - but outdoors in noisy conditions, you will need a tripod to hold the boom for the microphone. Jaycar Electronics Australia sell two heavy duty tripods for flood lights at a little less than A$100 each - the tallest one is the one to get - make up a clamp to hold the boom.
Buy good quality headphones. The headphones are connected to the video camera. If your video camera does not have a headphone socket - the microphone cable can be led through a audio mixer, which must also have a headphone socket. Refer to short cables, for details of connections to the camcorder - see fig. 3 above.
You need to provide sufficient light, so as to create appropriate shadows and contrast and no more. Do not buy any lights until you actually need them.
When exterior light is mixed with interior light - you will get a blue cast from the exterior light.
When indoors - the light coming in through doors and windows should be kept out of the picture by locating the subject away from it. We block it with cardboard behind curtains. Garbage bags behind thick curtains will eliminate the blue cast and only slightly reduce the strength of the light. This is a good option, when indoors and the external light coming in is a problem. The best way is to switch off all internal lights and use halogen lights with blue gel in front of them - the external light can then be allowed to enter the room.
You can use the halogen lights outdoors, with the blue gel in front of them. If you use the household tungsten lights outdoors, you will get a slight red cast - it is not severe - if you are desperate, it can be ignored.
Refer to Part 11 (Lighting) for further details, this also contains information on using Cold White (blue ) fluorescent bulbs in reading lamps.
60 watt reflector bulbs in two reading lamps
These maybe all you need to buy - you can make movies without the lights mentioned below. Get reading lamps with spring-loaded clamps that will attach to tables or backs of chairs. Make simple one metre long timber handles - so the lamps can be hand held. Home made stands two metres high are useful.
One 150 watt halogen floodlight plus a frame to hold blue gel.
The blue gel should be kept 100 mm away from the light.
You can bounce the light of a white ceiling (without the blue gel). This is a good move, but you cannot use the microphone on a boom - you will get a shadow from it unless when you are shooting mid shots or close-up's, when you can hold the microphone below the waist and aim the microphone up.
Use the blue gel if there is a problem with exterior light - but note that the light is severely reduced. This light is handy for reducing shadows on the wall behind the actors. It will also be very handy for outdoor use, with the blue gel in front of it.
Twin 400 watt halogen floodlights (from a hardware store).
Plus a 1200 mm wide by 600 mm high frame to hold the blue gel 100 mm away from the lights. Make it from aluminium fly screen framework. Mainly used outdoors.
[In UK B&Q sell a 500watt halogen light on a stand that goes up to 2 metres high, for £25 in mid 2007.]
The only filter that is essential is the UV filter.
This is used to protect the camcorder lens. Leave it on the camcorder all the time. It will not effect the exposure or colour. Check that the lens cap will fit over the UV filter without touching the glass in the filter. If you need an extension ring and cannot get one, buy a second UV filter and remove the glass from it. Rest the glass lens on a raised object. Place a cloth over it - so that glass fragments do not fly up into your eyes - now tap the glass to break it.
The UV filter removes haze from distant landscapes. This haze is scattered ultraviolet light. Fog and mist are water droplets - the filter will not effect them.
There is a trick to removing filters - your fingers should have a light grip. If you squeeze too hard, the ring distorts and jams.
Polarizing filters.
Now this one sounds great, but you can do without it unless you want to take
shots of fish swimming underwater. If the camcorder lens barrel rotates while
focusing - you need a circular polarizing filter. This has nothing to do
with the circular shape - the regular one has a circular shape but it is
different.
- It will remove reflections from car windscreens, photos, oil paintings and water surface so you can see the fish.
- It will remove the reflections on bus windows - when taking video shots from inside the bus - but if the bus window also has a polaroid coating that then adds mottled spots all over the picture and you can't use it.
- It will enrich the colours on scenery and bring out the contrast on clouds - but there is a catch to this. The sun has to be low in the sky and out to the left or right - early in the morning or late afternoon - say before 10 am or after 3 pm. If the sun is high in the sky it won't work. If the sun rises behind you and sets in front of you, the sun's path is in the wrong place and it won't work. In all my travels, I was never in the right location, relative to the sun, for the shot I had selected.
- Rotate the polarizer so as to get the desired effect.
Neutral density filters (ND).
They are grey in colour. If you have a 2x and a 4x - then the two used together = 6x. They reduce the light - this opens up the aperture - which reduces the depth of field . This helps to throw objects in the distance, out of focus - eg., unsightly factories. Needed rarely - in 14 years, and 10 overseas trips, I only had two occasions when this would have improved my video shots.
Graduated grey filters.
A grey graduated filter, with one half clear and the other half neutral density, is used for day-for-night shooting so as to darken the sky. I haven't tried this yet. It is also used to fix hot spots on a sunny day - eg. bright light filtering through a gap in the trees. I have seen this filter used on one occasion. Holding an umbrella up to block the sun, can sometimes solve such problems.
Graduated brown or blue filter.
Used in day-for-night shooting, with film. I haven't tried this yet . I have read that it is difficult to make it work in video - but it is worth knowing about. Better to shoot just before dawn or just after sunset when there is a low level of light. You will have to be quick if you are taking more than one shot.
We have used them a lot, when I have had other people operating the camcorder, but I don't like reflectors.
It is possible to manually adjust the exposure for a better result. To do this, you need to locate the actors and the camcorder correctly relative to the sun. The person holding the reflector needs to use some skill to get the correct contrast and to avoid blinding the actor. Look closely at the actor's face so as to get the right contrast on each side of the face. The reflector should be mounted on a stand for the best results - a hand-held reflector wobbles around too much.
You can manage without a wide-angle lens adaptor, but they are very popular with experienced home movie makers. They get a lot of enjoyment from using them.
The camcorder must be set to wide angle. Do not zoom at all. You can accidently have the picture slightly out of focus and not notice it. You can end up having a lot of spoilt shots. Always remove the wide-angle lens adaptor after each use, before the next shot - because you will forget it is on the camcorder and zoom which will probably spoil the focus.
< Part 2 | Introduction | Part 4 >
© copyright Arthur Bullock, 2007
Share your passions.
Share your stories.