
|
The world of non-commercial film and A-V |
Events Diary | Search | ||
| The Film and Video Institute | | ||||
The Videomaker's Journey: part four |
Contents
- Preliminary check.
- Black the video camera tape.
- Using the image stabilizer
- Using the tripod.
- Zooming.
Check that the eye piece is adjusted for your eyes, especially if you haven't used the video camera recently.
To avoid taking shots of your feet, the ground and the sky: just before the start of each shot concentrate on checking the eye-piece or the flip-out screen. Is the video camera switched to standby or record? You will soon get used to remembering to do this.
Refer to Part 1 (Introduction) and the four basic steps that will help you to improve your video shots.
Record 30 seconds of video black at the start of each camera tape. Better still video black the whole of the camera tape. This physically frees up the tape and writes a control track on its whole length. It also avoids problems with some editing software which will stop importing the video clips at a gap in the control track. These gaps can get into the recorded tape, if you are not careful when you are reviewing a shot. [To black all or part of a tape, leave the lens cap on and set the camera to record ... but remember that it will still be recording sounds, so if you are blacking a 60-minute tape shut the camcorder in a cupboard or go off and have a relaxed lunch while this is happening.]
A video camera with an image stabilizer, if properly used, will only reveal a slight slow movement of the frame when recording, this is acceptable for family and travel movies.
There are two types - one is the optical image stabilizer - this has a lens which wobbles about so as to compensate for hands that shake - it is considered to be the best system. It provides a sharper picture because all the available pixels are used. The other system is an electronic image stabilizer, which has an enlarged picture - the edges of each frame are trimmed - the trimmed picture is then floated centrally. This wastes useful pixels, so the picture quality is not as high as it could be with the other system. Only experts with sharp eyes or test charts will notice the difference.
I find the electronic system to be completely satisfactory - but there is a certain technique to be used when panning or tilting, so as to maintain a smooth video shot. It might be that some manufacturers have now fixed the problem.
As you start the pan or tilt - you must gradually accelerate up to the speed of the pan or tilt. If you you make a sudden start, the image lags behind a bit and then it lurches to catch up. At the end of the pan or tilt you must gradually decelerate to a stop, otherwise the image will surge past the end. If you make a sudden stop, it then reverses back a bit and stops.
I leave the image stabilizer switched on - it helps to make for smoother shots. I have never had a problem with this on any of the four video cameras I have owned. With some video cameras - the image may creep or roll very slowly when taking a static shot. If that happens on yours, you then have to switch the image stabilizer off.
Make sure the video camera is securely attached to the tripod before removing both hands from the video camera.
Before you start to record - check that the picture is truly horizontal by panning and tilting a bit so as to see some horizontal and vertical lines relative to the sides and bottom of the frame. Take extreme care with this.
If the tripod does not have a fluid head and does not pan or tilt in a smooth manner. it is still possible to use it effectively. Hold the aiming handle with one hand and release the friction clamps with the other. Grip the top of the tripod with the lower three fingers of your spare hand - the thumb and the first finger are to grip the base of the video camera. Press the tripod down - the static shot will be steady, even in strong winds - and you will be able to pan and tilt smoothly. Start the video camera recording. Grab the handle and now control the movement in a smooth manner. Use your computer to edit out the unwanted movement at the start and end of the shot.
Warning: When using this system always remember to lock the video camera in place before removing both hands from the video camera. Otherwise the sudden bump, as the video camera tilts forward, may throw the back focus out of adjustment.
Zooming.
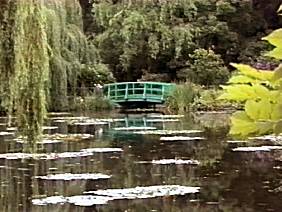
With travel and family video shots start with a 3 to 4 second close-up where
the camera does not move. Then zoom slowly back to a wide-angle shot and
hold that steady for about 3 to 4 seconds. Then stop recording. See Fig.
1.
Do not zoom from a wide-angle into a close-up - the scenery disappearing from the screen is disconcerting to the audience.
Introductory shots for dramas will often start with a 3 to 4 second wide-angle shot, then zoom slowly into a close-up of someone at a door or window. One of our favourite shots is to zoom into the close-up of a door or window, then edit a cross-fade to an indoor shot. This indoor shot may also zoom or track further along the inside of the building. The audience will have the feeling that they are traveling with the zoom.
|
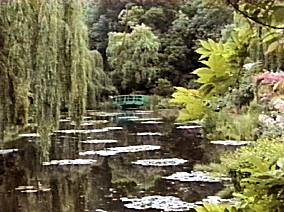 |
Start with a relative close-up, held still for 3 seconds. |
In the middle of the zoom out. |
|
pictures of Monet's garden near Paris. |

< Part 3 | Introduction | Part 5 >
© copyright Arthur Bullock, 2007
Share your passions.
Share your stories.