
|
The world of non-commercial film and A-V |
Events Diary | Search | ||
| The Film and Video Institute | | ||||
The Videomaker's Journey: part fourteen |
CONTENT
- Drafting the Shooting Script
- A Summary of the Shot Sizes
- Drafting the Storyboard
- Advice for Beginners
- Storyboard System 1
- Storyboard System 2
- Storyboard System 3
- Sample Storyboard from the Movie Dressed to Kill
- Sample floor plan from the movie Dressed to Kill Scene 2
- Sample floor plan from the movie Dressed to Kill Scene 4
- Sample floor plan from the movie The Problem With Harry
- Sample storyboard from the movie The Problem With Harry
The shooting script is drafted by using a "B" lead pencil to mark the shot sizes and stage directions on a spare copy of the screenplay. The screenplay is spaced to allow room for the shots to be so marked. When this is photocopied the pencil marks come up black - refer to sample below. You will probably find it necessary to re-space the screenplay after you have made your rough draft of the shooting script. Once you have made a few movies, you will generally be able to space your screenplay in a satisfactory manner as you write - you visualize about how you will take the shots as you write your screenplay.
Refer to Part 7 Framing and composing the
shots - 2 for illustrations.
BCU |
big close up (chin to forehead) |
CU |
close up (from shoulders up to above the head) |
MCU |
medium close up (from the elbows and breasts and up to above the head) |
MS |
medium shot (from just below the waist and up to above the head) |
MLS |
medium long shot (from above the knees and up to above the head). |
LS |
long shot (contains the full height of a person). |
VLS |
very long shot (a wider angle shot with more background). |
OTS |
over the shoulder |
 |
If the actors are speaking - have them speak while they are standing still
and close to the microphone. This makes it easy for a home movie maker to
record quality audio. If the background noise is very quiet - and if you
are desperate, you can take the shot while they walk and talk even if the
actors are up to 5 metres away from a good quality microphone.
Fay Finlay and her husband Don, with a friend Ross Wilesmith, have made about 130 movies over the last 30 years. Some of the movies are brilliant - the others are very good. Fay empathises - visualise the scene as you write. She is very good at thinking up original stories that are easy to make into movies. Fay is also very good at writing shooting scripts and producing movies. Don's camera work is equal to the best. Fay and Ross, both very good actors, are in most of their movies. Their movies are mainly comedies. They tend to use mid shots, rather than close ups which seems to coincide with the advice given by Woody Allen. The book, "Moviemakers' Master Class" by Laurent Tirrard [www.amazon.co.uk in late 2007 had copies for £8.57) includes an interview with Woody Allen, who advised that with comedy you need to use more open frames and don't cut too often.
Some movie makers don't use a shot list or shooting script - they put it all on the storyboard.
The storyboard can be a complicated document. The storyboard is the engine that drives the making of the movie. It also checks the shooting script. It also saves time on the shoot. Keeping the actors' time on the shoot to a minimum is very important.
When I started to plan the first movie that I made with actors from the repertory theatre I was a little apprehensive about it - but the moment I had completed the storyboard I immediately felt relaxed and confident.
Some people will handle the drafting of the storyboard with ease. Some other people will not bother with the systematic approach to making movies - they will be quite happy to continue making movies without all this planning, struggling at times but happy. But it has been noticed that I easily get on with making movies seemingly without problems.
The director and camera operator should visit the site together and take suitable photos with a digital still camera. This will help you draft the storyboard. Once you have had some experience this is the occasion when you will plan, in a general way, how you are going to make the movie.
As you draft the storyboard you will be amending your shooting script to suit the various situations. After you have made several movies your experience will allow you to be very quick with this process.
What I have written below may seem daunting for a beginner . The first movie you make should be very short - 2 to 3 minutes long. Have a go!
- if possible watch other home movie makers in action. We have had several beginners come along and watch how we operate. Or try to get an experienced home movie maker to help you make a start.
- There is a need to look at Part 17 - the Theory and Practice of Editing so as to understand what a jump cut is and what crossing the line means - and the need to avoid them.
- Remember you cannot learn how to make movies by just reading about it - you have to make a lot of movies as well. Read my notes below. Absorb what is easy to understand. Then look carefully at the sample movies and video clips I show in Part 17 - the Theory and Practice of Editing. Use these movies and video clips as a guide as you draft your storyboard.
- Don't expect to do all that I have set out below in the first movie that you make. Gradually learn it as you make each movie.
If there is a problem from one shot to the next , it is usually better to combine these two shots into one shot rather than inserting a third shot between them.
Keep in mind the golden rule of taking the shots - with a documentary "Get in close and after each shot look around for cut-aways."
With a drama "Get in close often" and also take reaction shots where necessary.
If you use "the overlapped shooting system" you will automatically get most of the reaction shots. (This will be explained in Part 18 - Producing and Directing the Movie. The actors enjoy this process where they act as a group through several shots with the off screen actors saying their lines. We have one actor who prefers acting in our movies to acting on the stage. At the moment we have over 30 actors in our actors' pool.
Use a variety of shots: tracking shots from a wheel chair, OTS shots, CU shots, a two-shot where both face the camera then the one nearest camera turns to face the other person thus ending the shot as an OTS shot. Provide a MS from time to time to break up a string of CU's. Look carefully at how the first few shots will introduce the movie - and how the ending will be shown. If you have been reading some books on how to make movies, you will see comments that tell you to start with a LS that establishes the scene, then follow this with a MS as you move on to a series of CU's. The sample screenplay that I show uses a series of shots that gradually establishes the scene. The French director Claude Sautet does this.
Mark on the storyboard the instructions for the camera operator such as "Walk into frame and walk out of frame" and notes for the editor such as "Fade in and fade out." After you have completed your first draft of the storyboard read Part 17 - the Theory and Practice of Editing again and then work on fine tuning the shooting script and the storyboard.
A storyboard of the comic strip type - complete with all the stage directions and the actors' dialogue. There is no need for a shot list or shooting script. This system is used by very experienced movie makers and it is the easiest way for a beginner to start.
The people can be drawn as stick figures - or with rough sketches - or as well drawn illustrations. Sometimes there might only be a handwritten note in a rectangle.
I now describe the system I prefer to use. I didn't invent any of this - it has all been done before my time. Col uses a similar system.
I mark the shooting script on a spare copy of the screenplay. A storyboard is drafted for movies that are only one or two minutes long - that's all.
On movies that are three minutes and longer we measure the site and draw a floor plan roughly to scale. On this we mark the actors' movements and where they stand and sit. The storyboard is then drafted.
I then draw a not-to-scale sketch of the floor plan showing the camera locations and where the actors are for each shot. To know at a glance that the camera is located several times at a particular spot can be very helpful when directing. Where practical you can save some time in the order of taking the shots. There will be some advice on whether you should shoot in sequence or out of sequence in Part 18 - Producing and Directing the Movie.
I now work back and forth through the screenplay, the shooting script, the storyboard and the floor plan - making alterations as I try out different ideas. A fifteen minute movie takes about three months from when we agree on a story plot to the completion of the shooting script and the storyboard.
When the storyboard is final - that is supposed to be the time when Col starts to look for actors. What actually happens is that as soon as Col gets my screenplay he lines up the actors. There's no stopping Col - he gets carried away with enthusiasm. He is great to work with. As a result of this I now have Storyboard System 3 as shown below.
I now use the screenplay, shooting script, a floor plan drawn to scale and a not-to-scale sketch of the floor plan on which is shown the camera locations and where the actors are for each shot.
The floor plan which shows the locations of the camera and the actors is my storyboard. There are no illustrated pictures of the actors. It works fine for me - but it is necessary to spend extra time studying each shot on the shooting script. I have to look more closely at the shots each side of the shot in question.
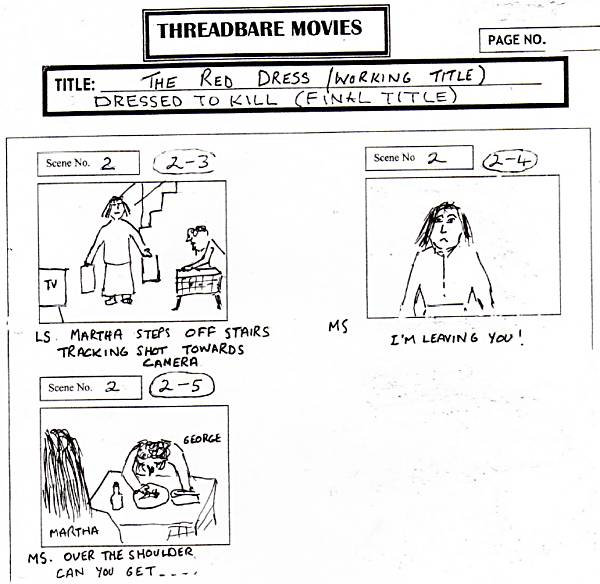
Sample storyboard from the movie
Dressed to Kill
written and directed by Col - I did the camera work.
This is the storyboard that was used to shoot the movie. Col drew about 80
illustrations for the storyboard.
 |
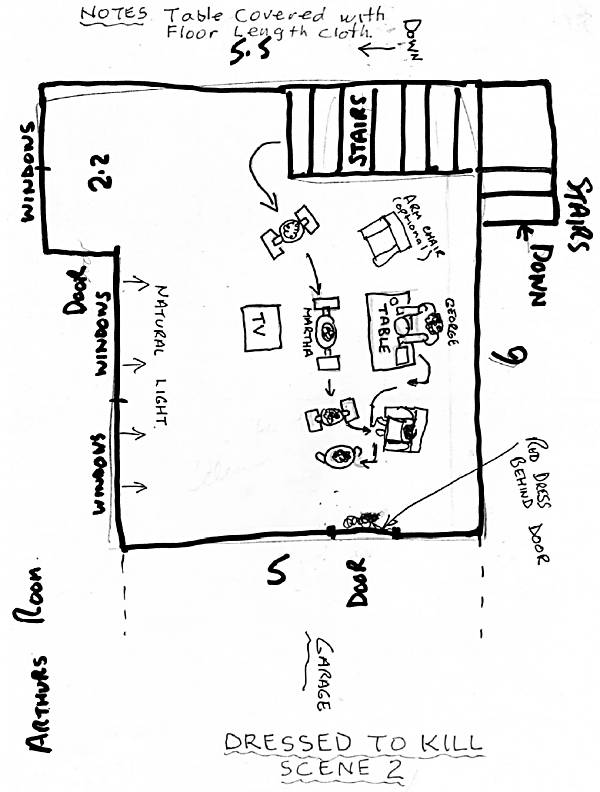
Sample floor plan from the movie
Dressed to Kill Scene 2.
 |
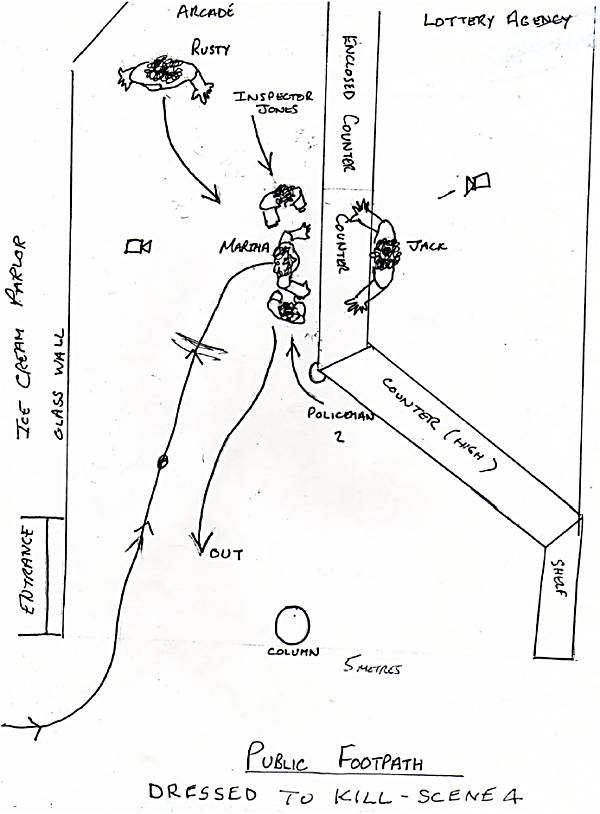
Sample floor plan from the movie Dressed to Kill Scene 4.
This scene was in the main street of Redcliffe - a crowded beach front shopping scene. We had a permit from the owners of the shopping arcade. There was a noisy crowded footpath restaurant alongside us - they cheered us at the end of the last shot where our two policemen arrested Martha - who was dragged kicking and screaming out of the arcade down the street. There was also a lot of noise from the ice cream parlour. Our system of recording the audio brought the background noise down to an acceptable level.
 |
Sample floor plan from the movie
The Problem With
Harry.
written and directed by Arthur Bullock.
This was the first time Arthur directed actors from a repertory theatre.
This and the next illustration are part of the actual storyboard used to
direct and shoot the movie.
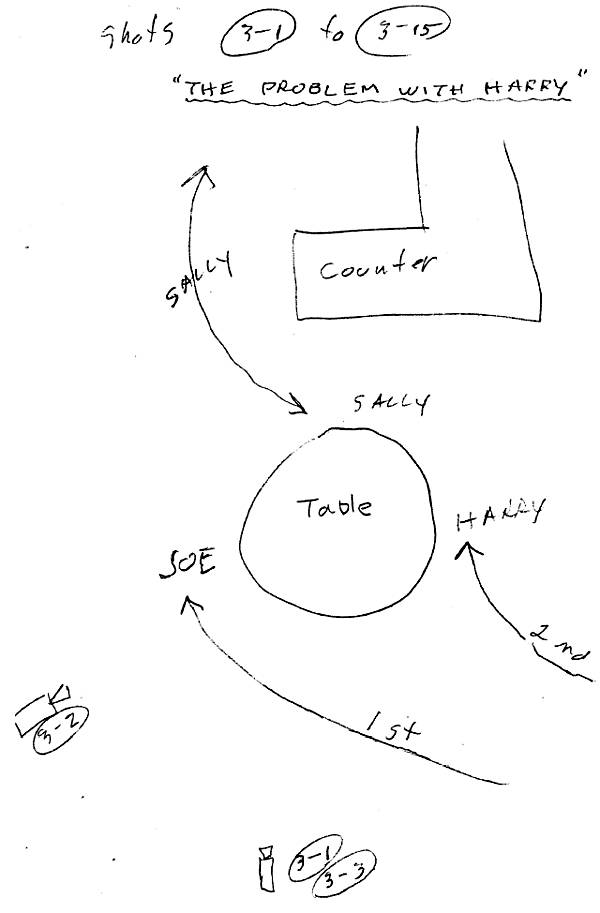 |
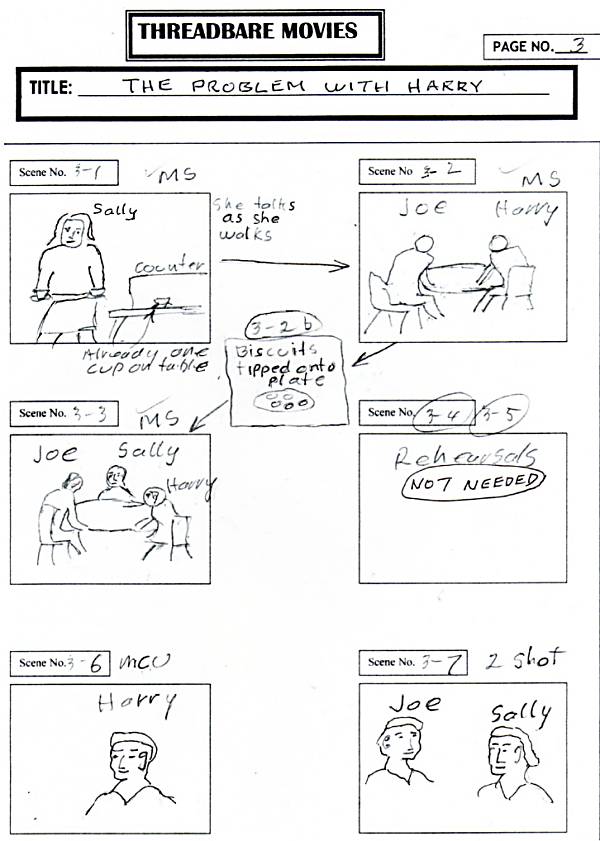
Sample storyboard from the movie
The Problem With Harry.
Over 100 illustrations were drawn by Arthur for the storyboard.
 |
< Part 13 | Introduction | Part 15 >
© copyright Arthur Bullock, 2007
Share your passions.
Share your stories.