
|
The world of non-commercial film and A-V |
Events Diary | Search | ||
| The Film and Video Institute | | ||||
The Videomaker's Journey: part nineteen (a) |
DVDs are cheap to buy and to mail, easy to store, convenient to use for shows and since most modern DVD players can handle both PAL and NTSC - translating their output into whichever standard is used locally - they make it simpler to send movies to countries that use a different television standard. This first part of chapter 19 deals with authoring and burning (writing/recording) DVDs. It refers to specifics of the Apple iMovie6HD and iDVD systems but the general lessons are relevant to all DVD authoring programs. The second part of this chapter deals with archiving - see Part 19(b)
CONTENT
- Background
- Choosing DVD blanks
- DVD Types
- Copying DVDs
- Storage Space
- Burning DVDs
- Three ways to burn DVDs - step-by-step instructions
- My iDVD Check List
No one uses raw video. If we could record uncompressed what our camcorders see, it would require about 93Gb of storage per hour. MiniDV camcorders apply compression which brings this down to just under 13Gb per hour for SD (standard-definition) movies - the figure for HD (high-definition) movies is around 4 times more. This is what we edit in our computers.
When we burn a DVD of the finished movie an additional and different form of compression is applied. (Don't panic ... we speak of "burning" DVDs rather than "writing" or "recording" them only because recording onto a blank DVD uses a tiny laser to mark information on the disc rather than using magnetism as we do on hard drives, floppy discs and tapes.)
Each compression reduces the quality ... though so slightly that few of us can see the difference.
But if your only copy of a movie is on DVD and you want to re-edit it, you start from a lower quality than the original and will lose a little more when you burn the revised version to a new DVD. The golden rule is: if you might want to re-edit your material keep a copy on MiniDV tape.
In Europe many lower-priced camcorders can not record digital input through a firewire cable. The facility is disabled to avoid a heavy European Union tax. In such cases, when you have edited the film and want to store a copy on tape, you must send it back to the camcorder using S-VHS. The camcorder will convert it to digital form and the result will be a digital MiniDV cassette but with a slightly lower quality of image. If this is your plight, consider keeping a copy of the edited movie on hard-disk so that if you upgrade your camcorder in future, or borrow a camcorder with firewire input, you will be able to make a digital copy of the film with no loss of quality.
Always record on to top-quality blank DVDs.
| Maxell DVDs made in Japan - if you can find them - are excellent. The
Maxell and the Taiyo Yuden brands are the most reliable.
[ In mid 2008 British prices for single-layer Taiyo Yuden ranged from 22 pence to 48 pence each depending on type and quantity ordered. Maxell's ranged from 11p to 22p.] |
|
| There are cheaper discs on the market - and pirate copies of those top
brands. I do not recommend those at all. If there is no data or name printed
on the DVDs you buy, how can you check where they came from? You can download
a "DVD identifier" from the internet. I don't bother to check discs this
way, I put my trust in the supplier. [You can try a free download from http://dvd.identifier.cdfreaks.com which comes with a database of manufacturers too. My copy was perfectly "clean" but always check any downloaded file from any source with your anti-virus program before running it.] |
Do not stick paper labels on DVDs.
| The stick-on labels can cause problems in DVD players. If the DVD is
inserted into an iMac computer slot - it will jam inside the machine - you
won't get it out. It may jam in laptop computers.
Use a soft pen to write on the DVDs. Use a permanent ink marker that will
write on glass - such as a Nikko 150 or a Banford Sharpie-extra fine point.
You can buy DVDs with "printable" labels - either a dull silver colour or plain white. You can print your titles directly onto them with a suitable ink-jet printer, which gives them a very smart appearance. Many modestly priced printers now have such a facility. |
There are two competing DVD systems called DVD+R and DVD-R. For amateur film
making the DVD-R format is generally preferred and DVD-R is the disc format
recommended by the Apple Computer iDVD Help ”for projects that can fit
on a single-layer disc.” DVD-R comes in two main types:
DVD-RW is a re-recordable/erasable disc.
You can record, erase and re-record onto one of them many times. (Do not
confuse these with the DVD-R.)
DVD-R is a record-once disc.
When these discs are burned in DVD recorders Apple systems use “Read
and Write” mode - though that depends partly on the DVD recorder being
used. A computer with the appropriate software, can make these DVDs have
the “Read Only” mode, so that they can be played, but they cannot
be copied.
[These terms may be confusing to PC users. In Apple
systems "read and write" mode means that the file may be read and copied,
while "read only" means it can be read but not copied. In most PC-based editing
systems the option to apply "copy protection" to stop anyone copying the
disc is not available.]
A DVD is simply a storage device. You can use it to store all kinds of computer files: music, data, still pictures etc. as well as movies.
In the amateur movie world, however, we usually store our movie files in the special format that is used by commercial movies and which can play on a stand-alone domestic DVD-player. This involves creating special folders on the disc, adding playlists and compressing the movies from the "nnn.MOV" or "nnn.AVI" format to the "nnn.VOB" format. All those tasks are automatically done for us by DVD authoring programs such as iDVD on Apple machines or their equivalents on PCs. A good free authoring program is DVDFlick from www.dvdflick.net which takes almost any video file and makes it into a DVD - though it is not a video editing system.
By the way - copying commercial DVDs, even ones you have bought yourself,
is illegal in Britain and the movie companies use special tricks to make
it difficult to do so. In Australia “The Copyright Amendment Act 2006”
allows us to “Copy from one format to another for private use" and allows
“Copying of MP3s, CDs, cassettes and records for your own personal use.
Strict conditions apply - and Australians should refer to the Information
Sheets provide by the Australian Copyright Council. (See
www.copyright.org.au/publications/infosheets.htm)
| To give other people a copy of your film ... | |
| The files on DVDs you have made yourself can be copied digitally.
This is one simple way to make top quality copies for other people.
If you have only one DVD drive in your computer the software can copy your existing DVD onto a temporary file on the hard drive. You then remove your original DVD and put a fresh blank one into the drive and the software burns the data onto the new disc. If you have two DVD drives - either both built in to your computer or one of them an external drive linked with a firewire lead - just put your original in one drive and the blank in the other and copy across. |
|
| To re-edit the film ... | |
| If you might want to take a copy of your movie from a DVD in order to
re-edit it, you face problems.
The "nnn.VOB" file format cannot usually be edited directly. If you change the file extension to "nnn.MPG" and import it into an editing program some of them can translate and handle that. Remember that since the film has been compressed to the DVD format, it will have a slightly lower quality than movies imported directly from your camcorder. It is possible to play movies from a DVD recorder into a suitable MiniDV camcorder - but the signal will usually be an S-VHS analogue one. The camcorder will thus get a copy of the movie at a slightly reduced quality. Luckily I own two Pioneer DVD Recorders DVR-310 which have iLink Connections “DV OUT as well as DV IN”, bought several years ago which make perfect copies. It seems almost impossible to get DV-OUT on new recorders now. |
|
Movie files are bigger than almost anything else you will use on your computer. When you import an hour of film from your camcorder it takes about 12.7 Gb of space on your hard drive. While you are editing that hour of film you will need up to 30Gb of space to store the work-in-progress. Even with today's huge hard discs you will soon need to store your work somewhere else to make room for new films. The Appendix to Page 19b lists various ways of storing the material when you have finished editing and tells you how much space they require.
I describe the process used with the Apple iDVD software. Beginners should refer to the computer iDVD Help Line “Getting Started” and open the document. There are several options available in the iDVD software.
The Options
| Magic iDVD | This is a quick way to produce a DVD which has themes. Tell the program
where to find the movie, what title to use and which theme to use, then it
goes off and does everything for you. In iDVD terms a "theme" means a design of menu and matching buttons. Having a menu means you can burn several different movies onto one disc and users can choose which one to play. It is more like commercial DVDs and tends to impress users. I prefer to do this manually to have more control over the process. |
|
| One step DVD from a DV video camera | This just transfers everything you have shot straight from your camcorder
onto DVD. The program takes control of your camcorder, rewinds the tape to
the start, then copies whatever it finds there, compresses it to the DVD
format and burns a disc. An 11 minute movie took about 37 minutes to transfer,
render and burn to DVD.
You can “interfere” with the process by manually stopping the camcorder
as soon as it starts to rewind - wait about ten seconds - the camcorder will
automatically start playing and the video capture will then commence. If
you accidentally press Play on the Camcorder instead of waiting, it won’t
interfere with the process. |
|
| One step DVD from a computer file | This is a better option if you only want one movie on a DVD. It transfers
a movie file stored on your hard drive direct to a DVD. You can import your raw footage, edit it in iMovie and save it to a file. Then use this option to make a simple DVD. The catch is that you will only have one movie on the disc. You cannot save the DVD to a Computer File as a DVD Project or as any sort of file. |
|
| Editing a DVD with Themes | This is the one I use. It gives you full control over how everything in your finished DVD will look and work. | |
| DVD disc image | This creates a single file which includes all the folders and files needed
for a DVD but cannot be used as it stands. Think of it as being a zip/stuffit
file which has to be processed before it can be used. It can be used to create new DVD copies of the movie/s - complete with themes if you use them - and offers an alternative to simply copying one of the completed DVDs. |
I HAVE EXAMINED THREE WAYS TO BURN DVDS - Step by Step
Instructions
The first two are about burning One Step DVDs - these may be of interest to newcomers. I use the third system - Editing a DVD with Themes - it’s easy to do, as long as you use my Check List.
One Step DVD from a DV video camera
This process will make a DVD without Themes (menus) - but it will automatically start and it will automatically keep on replaying the movie. The disadvantage here is that - there is no video black between the end and the start, unless it is on the camcorder tape. Apple seem to assume that you will always want to start from the beginning of the tape. I find that is rarely the case. I play the film in my camcorder until it it at the point where I want to begin. These notes assume you will also want to do this.
Do not put the DVD Disc into the iMac until you are instructed to do so.
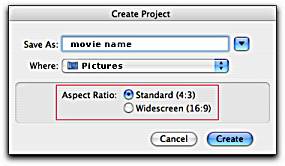
| Step 1 You cannot save this project to a computer file. This step is used so as to set the Aspect Ratio - ignore the other options - leave the default settings as they are.
|
CREATE PROJECT |
| Step 2. Check the SET Up
Once this is done, it will not alter, unless you change it.
|
PROJECT INFO |
Step 3. Set the camcorder tape at the Start Position
|
|
One step DVD from a computer file
This process will make a DVD without themes (menus) - but it will automatically start and it will automatically keep on replaying the movie.
Do not put the DVD disc into the iMac until you are instructed to do so.
| Step 1. Preparation. |
Trim or edit the movie ready to be incorporated in the DVD.
- Provide 5 seconds of video black at the start, this facilitates manual copying.
- Provide 10 seconds of video black at the end - this allows time to stop the DVD.
| Step 2. Open new file. You cannot save this project to a computer file. This step is used so as to set the Aspect Ratio ignore the rest. Leave the default settings as they are.
|
| Step 3. Check the set up.
Once this is done, it will not alter, unless you change it.
|
Step 4. File > one step DVD from movie file
- Finder appears
- Select "movies" or "external hard drive" > "select movie" > import
- When prompted, insert a DVD disc.
- The iMac automatically burns the DVD - the burn symbol is not used.
- The DVD will automatically eject when the burning is complete.
- You can quickly make more copies at this stage - as the rendering (i.e. compressing the movies to the VOB format) is already done.) Just choose the appropriate option.
Editing a DVD with Themes
This is the system I usually use. The "theme" is the
design scheme of the front page (menu page) of a DVD. The menu page is where
the different movies on the disc are listed and play buttons are shown.
The left two-thirds of the Project Window is the map -.
This process will incorporate a "theme", which can be a picture or a video clip, whether you want it or not. But you can use a plain black background, if you prefer. |
|||||||
| The use of some standard themes - which show 40 seconds of the movie
complete with audio - is confusing to everybody except the maker of the DVD.
It won't impress the audience. I have been present on several occasions when
people have wondered if the movie has actually started or not.
Make the "theme" (i.e. the menu) a still scene - better yet use a black background without a drop zone, as recommended by my notes. In Apple terms a "drop zone" is a space in the menu template where you can insert a picture or video clip: Don't have any music or sound at all with the theme. |
 |
||||||


Do not insert the DVD disc into the iMac until you are instructed to do so.
Step 1. Preparation.
| (a) | File the movies on the main hard drive, i.e. in the "movies" folder. The computer is now set for the easiest way to access the movie files. If you look at the top half of the Media Pane, you will see there is a way to access any of the files - but I prefer not to use that method. | |
| (b) | Trim or edit the movies ready to incorporate them in the DVD.
|
|
| (c) | Prepare stills for the menu display
[ Modern computers can easily use spaces in file names but we have shown them here with hyphens between words. This does no harm , avoids confusion when reading the page and is a useful habit if you also put pictures onto the web - where sometimes spaces in a filename cause problems.] |
|
| (d) | Transfer the stills from "picture" folder to "iPhoto library".
I could select the stills from a movie file, but I prefer to keep them separate - less chance of making a mistake . |
Step 2. Open new file.
Open iDVD > create new project > "create project" menu appears. (Refer to typical example CREATE PROJECT box shown above.)
- Save as "project name" if more than one movie, or "movie name".
- Where "pictures"
- Aspect ratio "standard (4:3)" or "widescreen (16:9)"
- Create
-
A default theme, “Travel Main”, now appears on the screen.

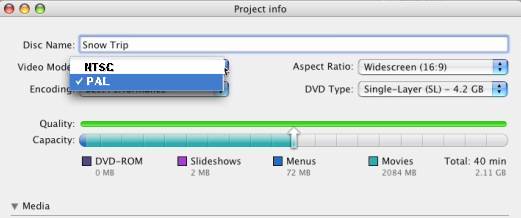
Step 3. Check the set up. Once this is done, it will not alter, unless you change it.
- Go to the tool bar at the top.
- IDVD > Preferences > General Menu > Projects. (Refer to typical example PROJECT INFO box shown above.)
- Select PAL
-
Select "best quality"
[ This may be called something different on your system: "professional quality", "dual-pass" and so on. Choose the one which takes the longest time to process ... it should give the best possible quality.] - Select DVD type "single layer" do not use "double layer" - there are problems with it.
- Close menu.
-
IDVD > Preferences > "General" menu > select or un-select "drop
zones".
You can choose to use or not use drop zones. I ignore this.
I use the following as a check list, when burning DVDs - if you press
some wrong buttons, it is possible to put bugs in the DVD, which prevent
it from playing in some DVD players.
The bottom of the screen has a toolbar:

| Step 4. Back to making the DVD | ||
| (a) | The "theme" called Travel Main is already displayed in the “DVD View”. | |
| (b) |
The first square on left, has a note Use if you want "auto play". Don't use it. The next square shows the selected "theme" - currently "Travel Main" but I will change that later. |
|
Links to the three movies will be placed on the next three squares
Remember to transfer stills from picture file to iPhoto file in step 1. |
||
Alternative A. I don't use this since I prefer a plain
background.
You can drag this image around in the drop zone, so as to fine tune the view. The “drop zone” is the pane within the window. |
||
Alternative B (this deletes background and drop zones - and
uses a plain black background)
|
||
| To edit the menu title itself - background etc.
[In Apple terms a "title" refers to the name of the clip or item being selected ... so this means more than just editing the actual words of the title on a menu from say "Arthur's Movie" to "Arthur's New Movie".] In the upper region the name of the theme (Travel Main) is shown - this is now to be edited to become the menu title.
[ Most DVD authoring programs offer similar choices.
Make sure your title is large enough to read easily and that there is a good
contrast between the letters and background. Some public shows have a tiny
monitor screen for the projectionist to choose the right film before it goes
onto the video projector for the audience. Have pity on the projectionist
and make sure he or she can read the names of your films easily. |
||
To edit how each movie title appears in the menu.
* now select the highlight colour for selected movie. (red is the default). This is the colour which surrounds a button when the viewer has navigated to it with the remote control or computer mouse. That way they know what will play when they click the play button on the remote or press Enter on the computer. |
||
| Step 5. Preview DVD playback. | ||
| iDVD and most authoring programs allow you to preview how the finished
disc will appear to users. They show an image of a remote control whose buttons
you can click on to simulate what the user will do when watching. This allows
you to check that everything works properly before going ahead. Click on the play symbol. It is essential to at least check the menu and the start - then fast forward to end and check that it does what you want - usually returning to the menu. |
||
| Step 6. Burn the DVD | ||
| Click the burn symbol > and when prompted > insert the DVD.
The DVD will automatically eject, when the burning is complete. You can quickly make more copies at this stage - as the rendering (i.e. compressing the movies to the VOB format) is already done.) Just choose the appropriate option. |
||
The second part of this chapter explains how to archive your movies.
< Part 18 | Introduction | Part 19(b) | Part 20 >
© copyright Arthur Bullock, 2008
Share your passions.
Share your stories.