
|
The world of non-commercial film and A-V |
Events Diary | Search | ||
| The Film and Video Institute | | ||||
The Videomaker's Journey: part twenty-one |
Older hobbyists shot movies on ciné film: 16mm, 9.5mm, Standard-8mm or Super-8mm. The film which went through their camera was the only copy. After developing, it had to be physically cut up into shots and spliced (joined) using sticky tape or a "cement". This precious original was then used for every show. It was subject to a lot of stress and always faced the risk of scratching. Transferring such work to video makes it easy to copy - dad's home movies can be treasured by each member of the family. Essentially amateurs do this by projecting the picture onto a small screen and shooting the image with their camcorder. There are other more elaborate and expensive techniques which few enthusiasts are willing to afford.
CONTENT
- Variable speed projector
- Fixed speed projector
- Recognising 8mm film types
- Recording audio
- Impedance levels
- Focus and exposure
- Projector screen
- Characteristics of 8mm, super-8mm and 16mm
- The process
- Sample movie
- Appendix
If you have no experience using ciné film, you will need to find someone who does. Usually the best approach is to ask the person who made the films to project them on his or her equipment. If that person is not available find someone who knows how to operate the old film projector you are using. Ask them to run the projector or teach you how to do this. You also need to know how to maintain it and handle the precious film.
You may be able to transfer some films in one go - but you will usually have to make your video copy in two or three passes to get the best results for every scene. You then edit the video to retain only the best parts of each transfer.
This article sets out the general knowledge you need, before you undertake this type of work. Towards the end there will be a precise list of instructions of what to do in the darkroom - in this list, any reference to the theory, will be kept to a minimum so as not to confuse the issue.
The projector's shutter-speed has to be set to a precise speed so as to get a good picture without flicker. A “visual speed counter” is not essential - you can watch the TV “monitor” and slowly adjust the projector speed until you get a good steady picture. If your projector is in good working condition and it has a variable speed motor (and if the speed control works in a slow smooth manner!) you are indeed lucky.
What's a “visual speed counter”? Some older film makers know how to set up a spinning disc and a strobe light which makes it easy to adjust the speed of the shutter so as to get a steady picture, but you need to let the set-up run for about 2 minutes to be sure you have got it right.
I have transferred eleven Standard-8mm films and five 16 mm films to DVD, mostly with very good results. This article explains how I shoot the material. Refer to Part 19 Burning DVDs and Archiving for advice on transferring the video to DVDs.
Some basic information:
| 1. | We had our share of problems and no doubt some other people
will meet with some of them.
The standard 8mm film projector we were using had a constant speed motor whose shutter speed was varied by moving a small lever. This moved a tiny rubber wheel across a disc. The wheel moves closer to the disc centre or further away so as to adjust the speed. It doesn’t adjust smoothly, it jumps! Getting the exact speed is usually impossible. The first time, we fluked it. We didn’t know it was a fluke and later on we altered the setting, to our sorrow. One movie maker we know, sets it as best as he can, and then uses a resister in the electric power to make fine adjustments to the speed. With us, someone holds finger pressure on the lever. We get about 40 seconds of good shots, then a fade to a very dark picture for about 5 seconds, then a fade back to a good picture. (See the appendix for an explanation of why this happens.) We then make another recording, with the video camera set to auto exposure, this gives us a recording a shade brighter than the original film. If the auto exposure is set to “auto spotlight” - it will be a shade darker and close to the exposure on the projected picture. If you look at “Section 8. Exposure” (below) you will see further advice on how to go about this work. Because it was difficult to adjust the shutter speed on the standard 8mm film projector - the “visual speed counter” was no help to us - it was all done by watching the “TV Monitor”. |
|
| 2. | If you have a projector with variable
speed... for transfer to video, the projector speed usually has to
be set at 16 2/3 frames per second, to get rid of an annoying flickering.
This applies to projectors that have three-bladed shutters.
Some 16 mm projectors have two-bladed shutters and such machines were designed mainly (or exclusively) for projecting at 24 frames per second. 16mm films were also shot at 16 frames per second. 16 mm projectors with two-bladed shutters must be set to run at 25 frames per second no matter at what speed the film was shot. There is more on this in the appendix to this article. Modern video editing systems allow us to speed-up or slow-down video pictures slightly if required. Now this has nothing to do with transferring the visuals, but it comes to mind when thinking about how the transfer of the Audio will be handled. Forget this for the moment and read on down to Item "5. If you want to record audio.” The 16mm film projector worked fine for the first two films. After that it became very difficult. We were constantly adjusting the shutter speed. The “visual speed counter" helped us to get started, but after that we had to adjust the shutter speed by watching the “TV Monitor”. We then moved on to using Bill Rahmann’s 16mm film projector. It worked perfectly. The Shutter speed was set by using the “visual speed counter” and it was spot on, no further adjustment was ever needed. |
|
| 3. | If you only have a projector with fixed speed... you can add a resistor that can adjust the electric power supply so as to tweak the projector speed - this must be made and fitted by someone who is qualified to do the job. If the resister is not designed properly, it will overheat and the shutter speed will start to vary. | |
| 4. | 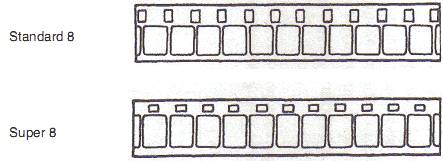 How to recognise standard 8 and super 8 film How to recognise standard 8 and super 8 film |
|
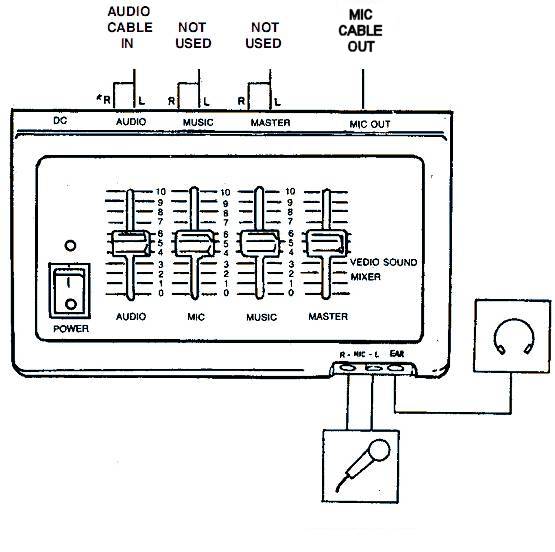
| 5. | If you want to record audio that
is on the film, at the same time as you record the video - you will need
a video camera that has a microphone input connection. An audio mixer is
also essential. If the audio mixer will convert line level audio (a high
output) from the projector to microphone level (a low output), so much the
better, it will then only need a slight adjustment when setting the audio
level.
If your projector only has a loudspeaker sound output (a high but adjustable level) start with it at zero and try to turn it gently up to just over half-way up its scale and then use an audio-mixer to reduce the signal strength to microphone input level. That setting tends to get the best performance from the projector's built-in amplifier. Bear in mind that it is usually possible to connect to a line-input socket on your computer and record the sound direct to hard disk. That may be simpler but you will have to resynchronise the sound and visuals later. If your editing system allows you to adjust the length of audio tracks by running them slightly slower or faster than normal, you may be able to match them to the images much of the time. The pitch of the audio will be slightly affected unless your editing system can change speed while maintaining pitch - as some can. Alternatively, the trick is to trim parts of the audio so as to get the audio to match the picture. Occasionally you may have to do it the other way round and shorten the video picture to match the sound. A good tip is to remove any existing cross fades at the cuts and apply new video cross fades - or just trim the ends of the shots. Using the audio from the original audio cassettes is our preferred option. The projectors we used had line level audio out. This had to be reduced to microphone level so that the audio could be fed into the "mic in" socket on the video camera. I use an S-VHS VCR that has audio level gauges, so as to fine tune the audio volume. All this will be explained below. |
|
| 6. | Impedance of line level audio and microphone
level audio.
First a warning - audio signals from the output socket of a tape recorder, VCR, TV etc. are very high when compared to signals from a low impedance microphone, which has a very low signal. If you accidentally feed "line level audio" into a socket meant for a low impedance microphone, you will blow something up - either your own ears, or your video camera or other equipment. The audio signals from all the movie projectors that I have seen so far operate with line level. |
|
| (a) | Line level audio (music and audio) is high impedance - it is the audio that is input into and output from video making equipment such as - video cameras, VCRs, TVs, DVD recorders, DVD players, cassette players etc. It is measured in many thousands of ohms. The white and red connections, are the left and right RCA-line level connections. | |
| (b) | Microphone level audio may be high or low impedance. Amateurs
usually use low impedance microphones, which are usually 600 ohms. Our video
cameras automatically convert microphone input into line level audio before
recording it to the tape, disc or card inside.
Headphones are of low impedance - only plug them into headphone sockets. If you are messing about with cable adapters, don't connect headphones to line level audio - you will blow your ears up! |
|
| (c) | Audio mixers automatically adjust the impedance from high to low
and back to high impedance - depending on how you connect the cables to the
various IN and OUT terminals.
If you are not sure about how to connect the cables, the rule is: Turn all the volumes down to zero - switch the power on - then slowly turn the volumes up as you listen. A friend of mine, who is an expert in these matters - and myself - use this rule when trying out new equipment and new ideas. On my audio mixer - the microphone, input and output is 600 ohm. The line level input is 50,000 ohm maximum - and the line level output is 5000 ohm maximum. Adjust the audio so that most of the peaks touch zero db - an occasional high level peak is OK, but no higher than about + 3db. |
|
| 7. | A digital video camera provides the best possible picture
quality. A Mini-DV video camera that also has an iLink / Firewire connection
that will import video as well as output the video, is ideal. You can archive
your DVDs back onto a Mini-DV tape. Refer to Part
19 Burning DVDs and Archiving.
The camera must allow manual adjustment of the focus and the exposure. The view in the eye piece and on the flip-out screen must line up with your monitor. If it doesn't, get the Service Centre to adjust them. The Panasonic 3-chip mini-dv video camera that I bought recently is spot on. My Sony D8 video camera had to be adjusted. My video camera eye piece and flip-out screen have the 4 x 3 aspect ratio - the films I am copying have the 4 x 3.3 aspect ratio - wide screen problems are a minefield - adjust the system I describe to suit what you want. [ Measure the picture the projector produces. Don't assume it will be one of the so-called "standard" ratios. It is a matter of taste whether you adjust things to include the whole projected image, which may mean including some of the black border you drew round your screen, or move closer but risk losing some of the edges of the image. There are times when you will have no choice. (See "11. Projector Screen" below for details of making a miniature screen to project onto.) For example if your camcorder shoots only in 16:9 and you are copying a 4:3 film make the black lines at the sides of your screen wide enough to fill the image. Or if you are copying a widescreen film with a 4:3 camcorder make the top and bottom lines wider. You may find it helpful to use matt-black card rather than inking thicker lines. Another option is the black felt-covered paper often sold in toy and craft shops. - Ed.] |
|
| 8. | Manual focus and manual exposure -
these are essential controls on a video camera used for this purpose.
Focus - you will need to lock the focus of the video camera on the projected image. (You might think that focusing on a sheet of newsprint held on the screen would be easier to do ... but that will not work - the resulting video will be slightly out of focus. You have to focus on the projected image while the film is running.) Auto focus systems - these work to select a sharp picture. (They do not work like infra-red range finders bouncing a signal off the subject to measure the distance.) Try setting the video camera on auto focus - run the projector - focus the projector - now where there are some sharp pictures in the film - lock the focus on your video camera. This is one reason to have a TV monitor connected up. Check it carefully to see that the resulting image is sharp. If necessary adjust the focus manually. The eye-piece or flip-out screen on your camcorder is so small that it may not reveal just how sharp or soft the image is. Exposure - if you are copying a movie that has a night shot with some darkness, you must have the video camera's exposure locked to a manual setting or it will try to compensate for the dark image. A movie that has the exposure properly set throughout the film is best recorded with a locked exposure. If some parts are too dark or too bright - go back and record these parts at a suitable exposure. You can then use a computer editing system to select and use the best shots, normally this is the best way to go about the job. If you have a film that has a lot of variation in the exposure - make another record with the camcorder's auto exposure turned on - for the full length. This will give you a fairly good result - but it will be just a fraction brighter than the projected film. Using the "auto exposure spotlight" video camera setting, will result in a slightly darker record that is closer to the desired exposure. When using "auto exposure spotlight" - where a bright scene is followed by a dark scene - 3 or 4 frames at the splice will need to be removed because the auto exposure takes about 1/8 second to adjust to the change of brightness. |
|
| 9. | You really need a computer editing system. You can fix faults in the video copy of the movie and easily adjust the audio, add music and titles. | |
| 10. | I use a 15 inch TV as a monitor - this makes it easier
to adjust the size and locate the framing of the video camera shots. The
TV picture frame should match the video camera frame, if it doesn't, use
the camcorder's eye piece or flip out screen to line up the shots. The brightness
and colour of the TV picture should match the video camera's picture. If
not use the video camera eye piece or the flip out screen, when adjusting
the manual exposure.
If the flip-out screen and the eye piece on your video camera and your TV monitor are not calibrated correctly as I have previously described - you will get a further loss when watching the movie on a TV, because most TVs crop all four edges of pictures.. |
|
| 11. | Projector screen - a sheet of white
cardboard is used. The standard aspect ratio in the video camera is exactly
4 X 3. The aspect ratio in the film projectors we are using at the moment
is nominally 4 X 3, but in actual fact it is close to 4 X 3.3. On the screen
mark a 4 by 3 rectangle - the black lines of the frame should be at least
12 mm thick. Width to the inside of the lines should be about 375 mm (15
inches). Projecting the film onto such a small screen provides a bright picture.
(If the original ciné film used a wide-screen format you should try
to shoot with a widescreen camcorder and adjust your rectangle to match.)
|
|
| 12. | Standard 8 film. The audio from
standard 8 film is dreadful. The splices cause a loud knock and the rest
of the audio wasn't crash hot - a problem of the system, not the fault of
the original film makers! We had to use the original audio cassettes with
the audio on them, and a computer editing system to add the audio to the
video.
[ Several film makers have rescued ciné productions and given them new life with brand new soundtracks - sometimes using the grandchildren of the original subjects to provide voices! - Ed.] Dirt sticks to the glue line at the splice between each section of film. I find that using a computer edit system to delete splices and any adjacent bright frames (caused by over-exposure as the original camera started up) will shorten a movie by about 25 seconds for each 10 minutes of movie. |
|
| 13. | Super 8 film - I haven't done any work with this film. I am told that there are no problems with splices. | |
| 14. | 16mm film - the first two films we recorded were perfect - then the speed of the projector became erratic - we are now overcoming that problem. There are no problems with splices. | |
 Set the
film projector, so that the required picture will be just inside the frame
marked on the screen. Get the top and the sides right. Sometimes this will
cut a bit off the bottom of the picture. If some of the shots should have
the top clipped, make a separate recording to get all the bottom part in
the picture.
Set the
film projector, so that the required picture will be just inside the frame
marked on the screen. Get the top and the sides right. Sometimes this will
cut a bit off the bottom of the picture. If some of the shots should have
the top clipped, make a separate recording to get all the bottom part in
the picture.
The Process
| (a) | Set the projector up and fix the white cardboard screen in place - this screen has the outline of the projected picture marked on it - as described above. | |
| (b) | Project a film onto the screen and get the picture lined up with the marked rectangle on the screen - the video camera will be set up to record the image that is just inside the rectangle. Adjust the focus of the projector. | |
| (c) | Set the video camera up, close, alongside the projector on the left-hand-side, with the lens at the same height as the projector lens. | |
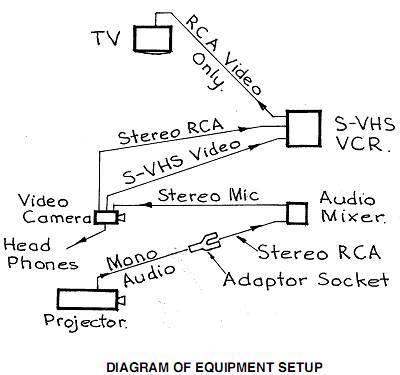
| (d) | Connect all the cables to the equipment.
I have accumulated a good variety of long cables over the years - so I can take what is listed below with me, and be sure I can set up the gear without a prior inspection of the site. If you need to buy cables, I suggest you have a preliminary set-up so as to sort out what you need - it all depends on where you have to place your equipment. |
|
| Headphone to video camera | 3mm diameter, stereo connection. | |
| Audio "line out" from projector to audio mixer "line in". | 1 metre mono cable. RCA sockets - mono to stereo. 1 metre stereo cable. |
|
| "Mic out" from audio mixer to video camera "mic in". | 1.8 metre cable with 3mm diameter stereo connections. (Spare 3 metre cable). |
|
| "S-VHS out" from video camera to S-VHS VCR "in". | 1.5 metre video cable S-VHS connections. |
|
| Audio "out" from video camera to S-VHS VCR "in". | 1.5 metre cable with RCA connections. | |
| Video "out" from S-VHS VCR to TV video "in". Have 3 cables and RCA connecting sockets for first time connection. |
1.5 metre cable with RCA connections. 3.7 metre cable with RCA connections. (Spare 1.9 metre cable). |
|
| Special AV cable to connect to video camera - if required.
Normally, I don't connect the audio to the TV - I use the headphones to monitor
the sound.
|
||
| (e) | Adjust the video camera set-up. The video camera is to record the picture that is just inside the marked rectangle. Use the TV monitor to check this set up. This system makes it quick, easy and accurate to get the video camera into position. The problem used to be that it was generally impossible to determine where the exact edge of the projected picture was. | |
| (f) | Project the film - adjust the speed of the projector so as to get a stable image. While a sharp picture is being projected - lock the focus on the video camera. Look carefully at the picture on the TV monitor - usually it will be a sharp image - manually adjust the video camera focus if necessary. | |
| (g) | Lock the exposure once you think that the exposure setting will be OK for a while. Normally you have to manually adjust to a slightly darker setting. | |
| (h) | Check that the audio recording works. Listen on the
headphones - adjust the audio mixer - note the settings. Take care when you
set up the equipment. Set the audio mixer controls to zero and gradually
increase the settings as advised above in "6. Impedance of line level audio
and microphone level audio."
Watch the audio-level gauge on the S-VHS VCR - and use the audio mixer to adjust the audio levels. |
|
| (i) | Now go back to the start - and record.
We then record the full length of the film. If there are problems - read the advice listed under "exposure". |
|
[ It may be possible to correct the film's colour in your video editor. Many old films lose some strength in the greens and blues.]
Sample movie
| I have included the movie That Saturday Last Summer, 4
minutes.
This film was made by Don Chapman, I have added the music. This transfer to DVD was made before we started using the target marked on the screen. Before this, I had great difficulty setting up the video camera. I used a scene that was slightly tilted, and as a result the titles are not quite horizontal. We were happy with what we got - but we will re-record this movie in the future. We were well briefed by Nev Long on how to do this work. We had a very rewarding success on the first transfer with a standard 8 film, we got it in one pass. The first two 16mm films we transferred were also recorded in one pass. The other eight films required several passes as described in “8. Manual Focus and Manual Exposure” - followed by a lot of work with computer editing. |
|
Acknowledgements
I have no experience with ciné film or how to operate the film equipment. The owners of the films did all the projection of the films. I received a lot of advice from experienced film makers on how to do this work. I now wish to thank Nev Long, Alan Beale, Don Chapman, Don Finlay and Bill Rahmann for their advice and assistance.
Originally Nev Long, taught me how to do this work. Later on I found that various movie makers were using slight variations as to how they transferred the film to DVD. The method I use is described in detail in this article.
Appendix
Comment by Alan Beale
When projecting film for copying to DVD, the correct projection speed in frames per second is determined by dividing 50 by the number of blades on the projector shutter. Most projectors have three blades, so for these the correct speed is 16 2/3 frames per second. Some 16mm projectors had only a two bladed shutter and were designed mainly (or exclusively) for projecting at 24 frames per second. Some (the Siemens for example) had a shutter that could be set to have either two or three blades.
If the projector has a two-bladed shutter, it should be set to run at 25 frames per second. To understand why this is important, it is necessary to visualise what the video camera sees of the image projected onto the screen. The shutter of the video camera (with standard settings) is open for 1/50th second for each frame. During this time, if the projector is set as indicated, what will be on the screen will always be approximately 1/100th second of projected picture and 1/100th second of blackout.
If the projection speed is changed from the ideal setting, this 50/50 ratio will gradually change, requiring the video camera to adjust its exposure. If the change is too fast, even the auto exposure setting on the video camera will not be able to keep up with it and the image brightness will show cyclic changes.
Various methods have been used to avoid this problem when a variable speed projector is not available. Setting a slower shutter speed on the video camera (when available) is sometimes effective, but will have the disadvantage that a"ghost" image will trail behind the main image where there is rapid movement. Sometimes, a projector set at 18 frames per second may be running a little slow and therefore close enough to the ideal speed for the auto exposure to keep up with the changes. However, the best results will be obtained by running the projector at the ideal speed as indicated and, by constant checking, ensuring that it varies as little as possible from the ideal.
The surface onto which the picture is projected is also important for the best quality. Trial and error is the best way to select a surface that suits the projector being used. In general, A4 size matt white photo-graphic paper will give good results with 16 mm and even with 8 mm and Super 8, though with the latter, a more reflective surface, such as a silver screen, is likely to give better picture quality.
< Part 20 | Introduction | Part 22 >
© copyright Arthur Bullock, 2008
Share your passions.
Share your stories.