
|
The world of non-commercial film and A-V |
Events Diary | Search | ||
| The Film and Video Institute | | ||||
The Videomaker's Journey: part twenty |
CONTENT
- Introduction
- Background notes for younger readers
- Problems with old VHS and S-VHS tapes
- Family and travel video shot with a Hi8 video camera
- Equipment
- My ACT Electronics VE4 - video image processor
Introduction
DVDs are cheap to buy, they record a good quality image, are easy to store, and are very convenient to play and watch. Unfortunately, DVDs do not have a long life, but that situation is easily handled, refer to "Part 19 - Burning DVDs and Archiving".
This article is all based on my experience and the methods and equipment I used - it all works. If someone hands me an old VHS tape and asks me to make a DVD from it - the process is simple - I load it to my MiniDV tape video camera (this restores the control track perfectly, dropped frames do not happen, the audio stays in sync) - I then transfer the video to my computer-based movie editor, clean it up shot by shot - and finally burn the DVD.
I originally archived all my video to S-VHS tapes, with a clean-up edit and picture correction edit. I later transferred it all to DVD discs, thinking that I now had a long life archive - this also made it very convenient to watch the video. Two weeks after I finished that operation, I found out that storage of video on DVDs is only safe for about 3 to 5 years. I then archived all the video to MiniDV tapes, this is now my backup - so I can replace DVDs. Refer to "Part 19 - Burning DVDs and Archiving".
I have re-arranged the method to suit someone starting from scratch with renovating their old video - someone who has not cleaned up or edited their video.
Background Notes for younger readers
In the early days of amateur video recording - before memory cards and DVDs - various competing tape formats were used. Tapes were encased in cassettes. The picture information was recorded by magnetic tape heads which spun very quickly from top to bottom of the tape, but at a slant (helical). That method packed more data onto the tape than the "straight line" (linear) recording used for sound tapes. Analogue recordings used a continuous stream of magnetism at ever-changing strengths to store the data. Digital recordings passed the signal through a device which split the stream up into tiny parts each of which has only two states: on or off. It sounds like a crude technique but digitised recordings take up less space on a tape and give much higher quality reproduction. They can also be copied easily without loss of quality.
The most common video cassette formats you will come across are:
 |
 |
 |
Video-8 / Hi-8 |
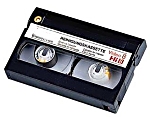
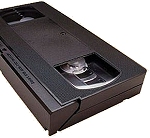
VHS / S-VHS |
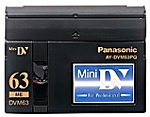
MiniDV |
| Video8 | analogue format using 8mm wide tape. |
| Hi8 | analogue video format (but with optional digital sound on high-end machines) on 8mm wide tape. |
| Digital 8 | a digital format on 8mm wide tape. Most camcorders for this format also handled analogue Video8 and could digitise analogue tape on the fly for output to a computer or digital recording device. |
| VHS | "Video Home System" or "Video Helical Scan" - analogue format on 12.7mm
wide tape. The basic kind had a single linear soundtrack at the top edge
of the tape. Later versions had an additional linear soundtrack on the bottom
edge permitting stereo sound. Still later versions recorded a stereo soundtrack
together with the video track giving "hi-fi" sound.
t was possible to use both "linear" and "hi-fi" tracks at once - for example with music and sound-effects on "hi-fi" and commentary on "linear". The "linear" soundtrack was separate from the video one and could be erased and re-recorded at will. The "hi-fi" soundtrack was combined into the video track and could not be erased or edited. Using both types of soundtrack at once was known as "mixed sound". A linear control track was also on the bottom edge of the tape providing pulses at the start of each video frame. |
| S-VHS | "Super VHS", an analogue format using 12.7mm wide tape but capturing a much better image quality. It had the same soundtrack options as VHS. The format was popular with amateur film makers but not the general public. |
| VHS-C | a compact form of VHS used in consumer camcorders. There is also a rare S-VHS-C format. The cassettes were about half the size of standard VHS ones and could be plugged into adapters which were the same size as VHS cassettes and thus played back on normal VHS or S-VHS machines. |
Signals can be passed to and from a camera, VCR (Video Cassette Recorder), TV etc. in several ways:
| Aerial signal | combines low quality pictures and sound in a form that can plug directly into the aerial socket of a tv set. |
| Composite Video | carries picture only in a modest quality but better than the "aerial" lead. |
| Component Video | carries picture only at a high quality but requires thick leads and short cable runs. |
| S-Video | carries picture only at a fairly high quality with modest sized cables that can have quite long runs. |
Note:
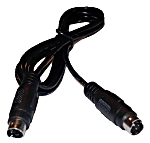 S-Video Lead - the S stands
for "Super" or "Separated" - was developed some years before the S-VHS recording
system. An S-VHS video-recorder was usually the first place people saw such
connections, so they associate the two. It is a cost-effective way to transmit
video image signals without too much loss of quality. The leads usually terminate
in small round DIN plugs with 4 or more pins in them. The format is still
widely used with digital as well as analogue signals. Note that it only carries
picture and not sound. S-Video Lead - the S stands
for "Super" or "Separated" - was developed some years before the S-VHS recording
system. An S-VHS video-recorder was usually the first place people saw such
connections, so they associate the two. It is a cost-effective way to transmit
video image signals without too much loss of quality. The leads usually terminate
in small round DIN plugs with 4 or more pins in them. The format is still
widely used with digital as well as analogue signals. Note that it only carries
picture and not sound. |
| Video Processors - were stand-alone electronic devices that could be connected between two VCRs when making tape copies. They usually slightly amplified the signals and offered a range of controls to adjust them. Brightness and colour corrections were the most common options. They were most needed when copying analogue signals. |
Time Base Correction
To make sense of the video signal another device like an editing program or a television set needs to know exactly where each new frame of picture starts. This can be a problem on analogue recordings. The microscopic physical variations on VCR (Video Casette Recorder) mechanisms and the stretching or shrinking of tapes mean that the signal does not always run perfectly smoothly. Most systems used a separate control track whose pulses mark the start of each frame. If there are problems with that the pictures can be distorted, break up or show a lot of pixillation.
Most tv sets and many VCRs had a TBC (Time Base Corrector) in them which stored up the variable signal coming into it and released it at a steady rate to give a smooth picture. There were also stand-alone TBCs which could be connected between two devices. Stand-alone machines often had more power to adjust the delay and could syncronise two or more signals so that they could be mixed smoothly into one another.
Loose tape tension will also cause tape jitter (disturbed vertical lines). Make sure that the VCR Automatic Tape Tension Adjuster is switched on.
Problems with old VHS and S-VHS tapes
Old VHS tapes (plus VHS video that has been transferred to S-VHS tapes and Video-8 that has been edited onto S-VHS tapes) cannot be loaded directly to a DVD recorder or the Casablanca Avio movie editor without having problems. The control track on these old tapes seems to deteriorate as the tapes get older. The old tapes will play OK in a VCR (Video Cassette Recorder), but as soon as you try to load them into a computer or a DVD recorder defects show.
I find four main problems that need fixing:
-
Frames are dropped and some other frames are left shaky at the ends of each
video clip. Sometimes old VHS video tape will also have some video being
shaky in the middle of some of the video clips, even though the problem cannot
be found when examining each frame on the old tape, going forwards or backwards.
Going forward shows the first half frame - going backwards shows the second
half frame.
The picture loss can be as much as 1/4 second per fault. When video frames are dropped the audio is not always dropped, so the audio soon gets out of sync. To fix the problem load the video through a camcorder onto a MiniDV tape or a D8 tape - this usually restores the control track perfectly. (How good a job it does depends how good the TBC (Time Base Corrector) in the camcorder is.)
If you have an old video processor, and it easily does a good job - this is the time to use it. Connect it between the VCR and the camcorder to adjust the brightness and the colour as you load the video to the MiniDV tape. I found that my old video processor will do a better job than the computer, when adjusting the colour and brightness. Refer to "equipment" for more details.
The method is to work it in "one minute segments". Play the tape for about one minute, you now know which parts should be loaded one scene at a time. It will be easy, for example, to bring up very dark foliage in the background to a nice green colour where you can see the various shades of brightness - then each clip that needs correcting, is loaded while the video processor is working on it. (Do not try to apply the same corrections to a whole movie - that rarely looks right. Treat each scene as a separate item.)
My video processor has a split screen so that I can look at the before and after effect, side by side, as I adjust the brightness and colour controls, this makes it quick and easy to adjust each video clip. Once you have determined the settings switch the split control off, before loading the video to the MiniDV tape.
I find that using a computer to adjust the colour and brightness is not very satisfactory, I can only adjust it a tiny bit. If you have the skill to do a good job with the computer, good luck to you. (There are plug-in programs for many computer editors that attempt to automate and simplify colour corrections.)
When the movie is on MiniDV tape, you can go on to load it into a computer.
-
Movies that were edited with mixed audio (sound from both the "linear"
and "hi-fi" tracks playing at once) may have to be fixed in a computer. Mine
were originally edited in a Panasonic FS90 S-VHS VCR. I now have a JVC S-VHS
VCR, the linear track plays at a much reduced volume compared to the hi fi
tracks, I had to load the linear audio track separately to the computer,
so as to adjust the volume. (Remember you can edit the "linear" soundtrack
but not the "hi-fi" soundtrack.)
-
Some of my competition movies had disturbances in the video - the S-VHS tape
was worn from a lot of use. I had to go to other copies to get bits and pieces
and use the computer to restore the video.
- Video shot with a video camera that has auto exposure only can be improved with a computer edit, or if you have a good video processor, use it in step 1.
The video can then be easily transferred from the computer movie file to a DVD.
Family and travel video shot with a Hi8 video camera
It is worth experimenting with various ways of transferring older video to digital formats. Some combinations of equipment work better than others. Do check your playback machine's menu and try any anti-jitter, "Best Picture" or similar options. When possible start from the very beginning of the old tape since any opening jitters may have vanished by the time the movie itself begins.
I found it was possible to transfer family and travel video that was shot with a Hi8 video camera and manually edited onto S-VHS tape directly to a DVD recorder. A few video frames disappeared at the ends of some of the video clips though most of them were OK, but there was no disturbance in between the ends . This did not matter as 99% of the video clips would be trimmed. I am keeping all my old video tapes, so I can always go back to them if I wanted the odd frame or two at the disturbed clip ends. The audio does get out of sync - but there are usually only be a few places where I have to correct it, when re editing.
Loading the video from the S-VHS VCR, directly to the Casablanca was impossible - the Casablanca would regularly stop recording the video at defects in the video tape. Fortunately. this video had already been edited - I did not need to use the Casablanca at all.
I watched all this video on a monitor as it was being loaded to the DVD recorder.
If you find that some of your video, that was shot with a Hi8 or S-VHS video camera, has faults in it, and you have a good video processor - treat it in the same way as I described for correcting VHS video in problem no. 1 as you load it to the DVD recorder.
Equipment
| Video Processor | to adjust brightness and colour. Video shot with a Video 8 or a VHS video cameras, that had automatic exposure only can be improved. Adjusting the brightness and colour with computer editors is very slow, finding the best settings can be very time consuming. |
| MiniDV Camera | converts analogue video to digital video and perfectly restores the
control track. This happens because these video cameras almost all have
TBCs (Time Base Correctors).
I read that digital video cameras that will pass pass through video will not correct control track faults. If you have a D8 video camera or a MiniDV tape video camera that has AV or S-VHS input connection, this will restore the control track on the video and convert analogue video to digital video in a perfect manner. There is no need to buy the converter box that will do this job. I understand that the old video mixers that have a strong TBC (Time Base Corrector) will restore the control track. I tried to buy one - but they were already snapped up by others that were restoring their old video tapes. It might be that your own equipment will do the job. If not there are various machines advertised on the Internet that will convert analogue video to digital video. Try to find someone who is using this gear and check it out, before you buy. I am surprised by the fact that a MiniDV video camera will usually restore the control track properly but a DVD recorder or a Casablanca computer, will drop frames etc. (I suppose this means the TBC (Time Base Corrector) in the camcorder is more powerful than the ones (if any) in the other devices.) Be careful about buying converter boxes. Make sure they will work. You would be well advised to buy a Mini DVD video camera that has AV, S-VHS and iLink (Firewire) in - it can also be used to archive to MiniDV tapes. |
| S-VHS VCR | an S-VHS VCR will help to maintain quality when replaying VHS video - you are using S-Video cables to transfer the video, also there is less loss when the video is read and converted to S-VHS video. |
| A movie editing computer | cleans up the video and corrects faults. |
| Act Electronics VE4 | video image processor. This was originally made in the UK then
sold to an Australian manufacturer. The original owner moved to Australia
and worked for the Australian owner. The controls are: level / contrast /
colour / detail / fade /split. I used this machine when manually editing
movies with two S-VHS VCRs.
It will handle VHS and S-VHS video - it will convert VHS video to S-VHS video,
if you do not have a S-VHS VCR. |
< Part 19 | Introduction | Part 21 >
© copyright Arthur Bullock, 2008
Share your passions.
Share your stories.