
|
The world of non-commercial film and A-V |
Events Diary | Search | ||
| The Film and Video Institute | | ||||
The Videomaker's Journey: part eleven |
Which is useful in the making of dramas and special movies. Note that most of this is in the "further advice" range and not for beginners. Advice for beginners is specially noted.
A Note for Beginners.
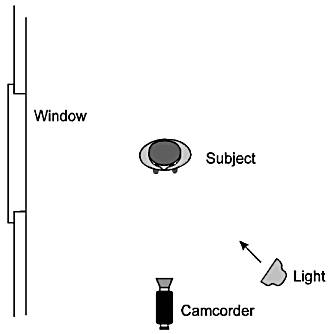
The normal practice when taking family shots in the house is to switch on all the room lights then manually adjust the exposure. If you waste time setting up lights the family will wander away. Avoid having bright windows or doors appearing in the picture. There are ways that an experienced video maker can deal with having the windows and doors in the picture - as described later in these notes.
Refer to fig. 6 - this shows a typical outdoor setup on a bright sunny day.
CONTENT
- A general comment
- Power requirements
- Locating the lights
- The colour of light
- Actors wearing glasses
- Special effects and mood lighting
- Rules of colour
- Care of lamps
- Only one light
- Two lights
- Three lights
- Four Lights
- Make your own lights.
You need to provide sufficient light, so as to create appropriate shadows and contrast, and no more. Take care not to use excessive light, otherwise the picture will look flat and lifeless. The light deteriorates inversely as the square of the distance from the source. If you double the distance, you will get one quarter of the light on the subject. If you reduce the distance to one third of what it was you will increase the light nine times. So moving a light slightly, can effectively adjust the strength of the illumination.
When using domestic light fittings, using stronger or weaker light bulbs is another way to adjust the strength of the light. Take care that you use light bulbs that are not above the rated wattage for the lamp fitting or power outlet.
Scrim is a special heat proof cloth - in one or two layers, that is placed in front of a light so as to diffuse or reduce the light. Make sure the scrim you are using is heat proof.
Initially set up the lights as suggested in these notes - then adjust or relocate them so as to get the desired result. With experience, looking closely at the actor's face will guide you as to how to set up the lights. Check the result in the video camera eye piece.
When the lights have been completely set up, I have always found it to be practical to use the manual adjustment of the exposure to fine-tune the contrast on the subject’s face. When outdoors and where there are shrubs and trees in the background, the manual adjustment of the exposure will also bring the leaves up into clear view, this is usually possible without affecting the contrast on the face.
I will be referring to light bars. Some houses have steel UC’s (Universal Columns, used as beams) or steel UB’s (Universal Beams) [British readers should think of RSJ's, girders or I-beams.] installed over large rooms, so as to eliminate supporting posts. Such girders make ideal light bars. Lamps that have spring loaded clamps can be clipped to the steel flanges, hanging upside down.
When taking video shots in stationary cars face the cars towards the sun or use handheld reading lamps fitted with Cold White (Blue) fluorescent bulbs.
When taking shots in moving car look for a park or open areas in the background alongside the roadway. You will need to use manual focus and manual exposure control to get a good result.
Avoid houses with light coloured paint on the garage doors - they will play havoc with your video shots.
A few home made domestic lights will work satisfactorily for the home movie maker. Refer to fig. 7.
Domestic power outlets [wall sockets] in Australia are rated at 10 amps, but you may find some power outlets labeled as being 15 amps. Don’t overload them. Watts = amps multiplied by volts. Domestic voltage = 240 Volts. Total watts allowed per each domestic power outlet = (10 by 240) watts = 2400 Watts - in Australia.
[In Britain the standard "square pin" wall socket is rated at 13 amps though a few very old homes may have "round pin" 15 amp sockets. Note that wall sockets are often in pairs and the 13amp rating applies to the pair not to each separate socket. Domestic voltage should since January 1995 be 230 volts but 240 volt supplies are still quite common. So from a pair of 13 amp wall sockets you could draw 13 by 230 watts = 2990 watts.]
Watch out for unwanted shadows from microphone booms, other equipment and various objects. Don’t have all your light coming from near the camera, or you will lose your shadows, the picture will look flat.
When taking the shots for a drama a white ceiling and walls painted with light pastel colours will work well with bounced light, as long as you are not using a microphone boom - unfortunately the boom introduces shadows.
The camcorder's auto white balance will, in most cases, satisfactorily adjust the hues created by the mixture of different colour temperatures. The home video maker needs to be aware of two situations, with regard to the colour of light.
(a) When outdoors the video camera’s auto white balance will adjust the hues to provide a natural picture. If lights are used in daytime - where you are working in dark shadows - a blue gel must be placed in front of flood lights so as to maintain this natural colour otherwise you will get a reddish cast on the actor's face. Note that the the gel reduces the strength of the light. Alternatively you can use cold white (blue) fluorescent bulbs in reading lamps. [A "lighting gel" or "colur gel" is a thin sheet of polycarbonate or polyester material placed in front of a lamp. Dyes in the plastic change the colour of the light cast by the lamp.]
(b) When the video camera is indoors, and all lights are switched off, the daylight streaming in through windows and doors will place a blue cast on indoor subjects. Switch iIncandescent lights on and you then get a reddish cast on indoor subjects such as walls and the actor's face. A slight reddish cast on the face is sometimes ignored, even by professional video makers.
If you need to use added light indoors - place a blue gel in front of the flood lights or use cold white (blue) fluorescent bulbs. You will not disturb the blue daylight coming in through the windows and doors. The camera will automatically adjust the light to a natural colour.
Lighting experts usually place a yellowish gel, (CTO - Colour Temperature Orange), over the windows to convert the blue sunlight to match the interior light but this is expensive. An English professional cinematographer gave me the tip about using blue light indoors as an alternative.
The use of fluorescent bulbs - warm white (yellow) and cold white (blue) - makes it practical for the home movie maker to use domestic light fittings to advantage.
Phillips make cold white (blue) fluorescent bulbs, look for the blue spot on the packet, these provide a blue cast. They also make warm white (yellow) fluorescent bulbs, look for the yellow spot on the packet, these provide a yellow, reddish cast. When you first switch on these lights they are weak - wait several minutes for them to warm up. The fluorescent bulbs only use a fifth of the power of incandescent bulbs, also the fluorescent bulbs won’t get anywhere near as hot. A 20 watt fluorescent bulb will be as bright as a 100 watt incandescent bulb, the ratio is about 1 to 5 for all sizes.
(Various manufacturers make these fluorescent bulbs including Osram Delux-EL, Radium Ralux, Quick Sylvania, MiniLynx, GE Biax-EL-D and Philips PLEC. In the UK they are sold as energy saving bulbs. Unfortunately there is no standardisation in the names and descriptions given to the colour of such bulbs. What we need are bulbs with a colour temperature of around 2700K for warm white (yellow) and 6500K for cool white (blue).
BLT Direct website includes a useful colour chart to help you track down suitable bulbs. Prices are around £8 but these bulbs are often on special offer deals.)
The rules for optical colour are different from those of pigment colour. Artists use three primary colours: red, blue and yellow.
The video optical primary colours are: red, green and blue.
e.g. if you mix red and green you will get yellow. The “Theory and Practice of Editing” will show you how to correct the colours when editing.
(c) Where there are thick curtains over the windows the blue cast will still enter the room. Open up dark coloured plastic garbage bags, to one layer and hang them behind the curtains. You won’t see the dark colour but the blue cast is removed. The light is slightly reduced, but it is still surprisingly strong. You can now use the flood lights without the blue gel, or you can use the warm white (yellow) fluorescent bulbs and the existing incandescent lights. I have found this to be the best solution to the problem. The garbage bags come in different colours - try one from a packet, before buying a large quantity.
This information was extracted from technical books. To get rid of eyeglass shadow try lowering your key light - alternatively, scrim your lights so as to soften the shadows.
Special Effects and Mood Lighting.
I have written and directed one ghost movie, night shooting for night-- this was a club competition shoot. I issued a set of instructions as to how the camera operators should practice with their cameras prior to the shoot - details are provided in “Producing and Directing the Movie”. I practiced the camera work beforehand so as to sort the lighting out. It was very successful. All the competitors edited a movie and entered it on the judging night.
Provide bright, happy lighting for comedies.
Mysteries and dramas should have darker backgrounds and deep shadows, the scenes should be generally dark, with the actors passing through shadows. manual adjustment of the exposure is essential to get a consistent shade of darkness.
Shining a torch up under the chin provides the ghost look.
Shine a strong light through a white sheet to create a soft look on the face.
If your video camera has a manual white balance control you can set it to get special effects as follows:-
(a) Balance on a yellow card to get a “blue cast” - this will provide a sense of night-time, darkness or a cold atmosphere. It will also create an “outer space” or a “supernatural mood”.
(b) Balance on a blue Card to get a “reddish cast” - this will impart a feeling of warmth, happiness or fire.
(a) Avoid white - it is too bright for most situations. Pale yellow and off-white will end up being white on the screen.
(b) Dark colours - maroon, black and purple will appear black on the screen.
(c) The best - use medium tone colours.
(a) Take care where there are glass and metal components in front of strong lights - they get hot and dangerous. Incandescent lamps get hot, professional lamps get very hot, keep them away from walls, ceilings, curtains and other flammable material.
(b) Handle professional lamp bulbs with a clean cloth - do not touch the glass with your fingers as this will cause the bulb to fail before its time. Do not switch lamps off and then on again in quick succession. Do not move the lights when they are switched on - allow the lights to cool a bit before moving them.
When outdoors in bright sunlight, a light at 45 degrees to one side will reduce the excessive shadows on the face of the subject. Alternatively, use a reflector. I don’t like reflectors, refer to Part 3 (Additional Equipment) for a detailed comment. I prefer to use lights.
Refer to Fig. 1.
When indoors, if the room's existing light is on one side of the face and it is sufficient to be the key light (main light) - then add a fill light on the other side, at an angle of 45 degrees and half a metre above the subject. If the existing light is to be the fill light, then place the key light at 45 degrees on the other side and half a metre above the subject. Bouncing a light off a white wall or a ceiling will provide an effective diffused light. |
 |
|
Two Lights and a Modelling Light - when in a dwelling with low ceilings.
The Key Light (strong light) makes the shadows - the Fill Light (weaker light) decreases the shadows, so as to soften the picture and arrive at the desired contrast i.e., a gentle hint of shadows on one side of the face.
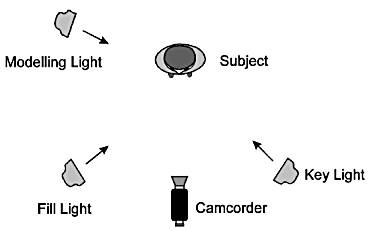 |
The Key Light is placed at 45 degrees to one side and half a metre above
the subject.
The Fill Light is placed similarly on the other side of the subject - at 45 degrees and half a metre above the subject as shown in the diagram. This is where I place it in all setups. About half the technical books advise this - the other half recommend that the Fill Light be placed alongside the camera as shown in fig's 3, 4 and 5. Try both locations and use the one that best suits the site. If your video camera has an in-built light and you have plenty of battery power or access to a power point - try using the video camera light as a Fill Light. You will have to move the video camera closer or further away to adjust the strength of the light. The Fill Light can be aimed at a nearby wall or reflector, so as to provide diffused light. |
|
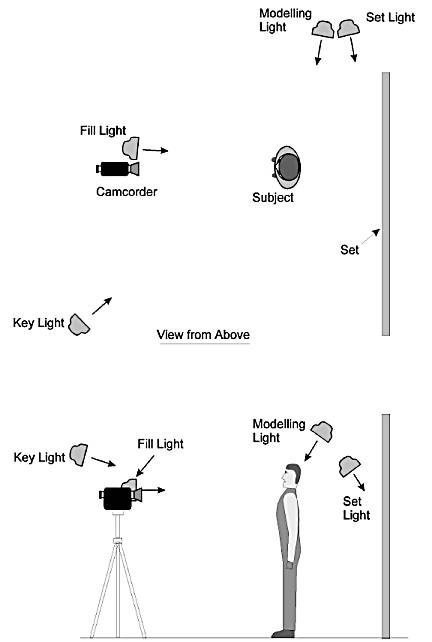
A Modelling Light is used where you have a low ceiling. It will provide depth to the shot and depending on the background it can make the shot quite pretty. Place the light slightly behind and to the side of the subject. For best results this should be a subdued light.
The recommended set up is use a Key Light, Fill Light - and a Modelling Light on the opposite side from the Key Light. The Modelling Light partially outlines the hair and helps to adjust the shadows on the side of the face.
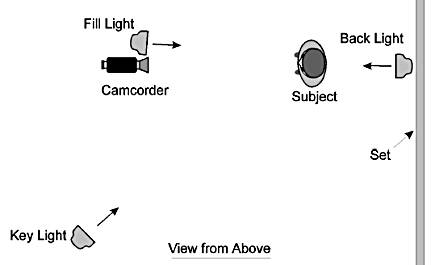
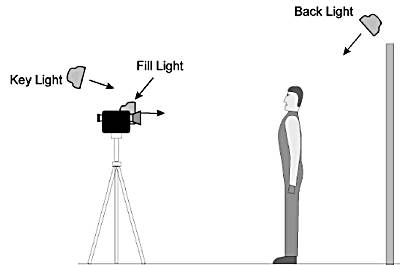
Three Lights - the third light is a Back Light - when you have high ceilings.
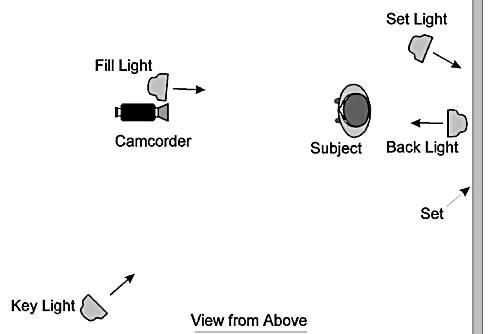
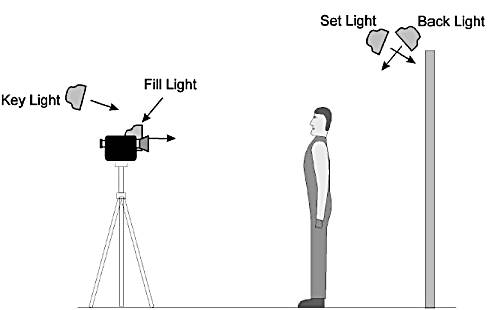
The Back Light will be above and behind the subject and aimed down at the subject. It would be mounted on a light bar, which would be the full width of the set. It should be well behind so that it outlines the foreground subjects. Watch out that it doesn’t shine into the video camera lens. (Fig. 2 shows an alternative location for the Fill Light.) Refer to fig 3:
 |
 |
|
|
The Fourth Light - is a Set Light which reduces or gets rid of shadows in the background.
The Set Light - if used, is placed above and behind the subject and it is aimed at the background set behind the subject. It is mounted alongside the Back Light on the light bar. (Fig. 2 shows an alternative location for the Fill Light.)
Refer to Fig. 4.
 |
 |
|
In a dwelling - the Set Light would be set up alongside the Modelling Light i.e., opposite the Key Light and to the side and slightly behind the subject and about half a metre above the subject. The Set Light softens or gets rid of unwanted shadows in the background. Provide a shield or barn door so that the light does not shine on the subject. (Fig. 2 shows an alternative location for the fill light.)
Refer to fig. 5.
 |
|
I saw a commercial TV station set up a shoot on Coogee Beach, Sydney at 10 am, bright daylight was the only lighting used.
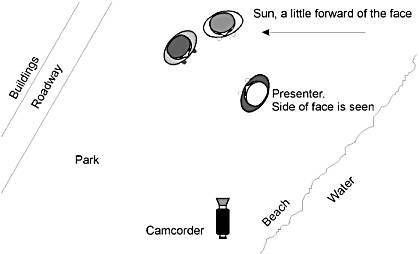 |
Fig 6 shows the situation - it was a bright sunny day. The sun over the water was the main light on one side of the faces. Light reflected from the water, the park's grassed areas, the road and the buildings would have supplied sufficient reflected light on the other side of the faces. |
Fig. 6 - Professional video shoot - 10am bright sunny day. |
|
How to make up your own lights.
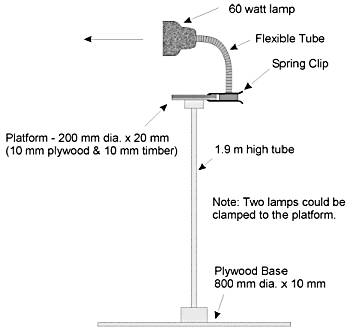 |
(a) Make homemade lights using reading lamps. Refer to Fig. 7.
Remember that you can use 20 watt fluorescent bulbs in the 60 watt rated reading lamps - they will be as bright as 100 watt incandescent bulbs. Also, make a simple timber handle, for use with the clip-on reading lamps. |
|
|
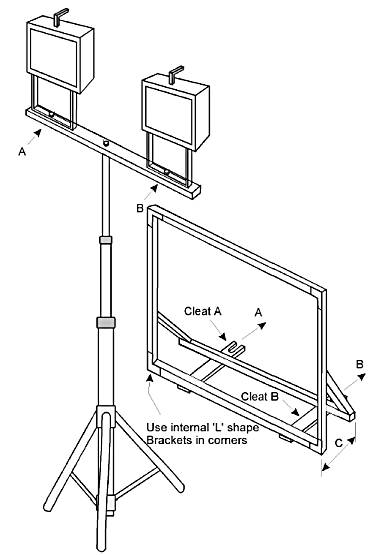
(b) How to use twin 500 watt halogen flood lights purchased from a hardware store for $50 - and how to build a frame to hold the blue gel. Refer to Fig. 8.
The lights bought from Bunnings, Australia; are 1.8 metres high. The frame to hold the blue gel is fabricated from aluminium Fly Screen Framework - use plated steel self-tapping screws or aluminium pop rivets to assemble the work. [In UK B&Q sell a 500watt halogen light on a stand that goes up to 2 metres high, for £25 in mid 2007.]
The frame to hold the blue gel is 800 mm wide by 500 mm high. Adjust this to suit the dimensions of your floodlights and your blue gel sheets.
Cleats A and B are made from 50mm wide by 3mm thick aluminium strip - slotted at one end so that they will fit around the lamp fixing bolts. I was restricted to 3mm thickness, by the length of the bolts - 30 mm wide by 5 mm thick will do, if your bolts are long enough.
Dimension C is to be such that the gel is kept 120 mm from the hot glass face of the floodlights.
 |
Use Lee's 201, Full CT Blue Gel - fix in place with clothes pegs on the
day of the shoot.
(CT stands for Colour Temperature). The blue gel will significantly reduce the strength of the light. The setup I saw, had the lights 7 metres from the actors. They did not cause discomfort to the actors. The lights were on for one and a half hours without burning a hole in the gel. The gel purchased these days seems to be more heat proof than the gel used a few years ago. Lee Filters make gels in various formats. A full sheet is 0.53m x 1.22m. Rosco make a similar range. A full sheet costs around £3.70 A theatre supplies and lighting shop is the best source. |
|
|
< Part 10 | Introduction | Part 12 >
© copyright Arthur Bullock, 2007
Share your passions.
Share your stories.