
|
The world of non-commercial film and A-V |
Events Diary | Search | ||
| The Film and Video Institute | | ||||
The Videomaker's Journey: part two |
Contents
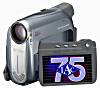
- A miniDV camera
- Desirable features in a video camera
- Tripods and handheld camera work
- Computers
- An external hard drive
- DVD discs
- Firewire connecting cables
Note that these articles were written for use in Australia. Comments in green have been added by the editors for British references.
The miniDV video camera is the best option for a beginner. It is also the choice of the experienced home movie maker.
Standard definition miniDV camcorders with a single CCD are very satisfactory
for a beginner - you can buy one for less than A$400.
[UK Jessops offer miniDV cameras from about £165.
PriceRunner lists prices from £122. Mid 2007 prices.]
Once you get some experience and know how to improve the lighting, the auto exposure can provide a picture that will compare favourably with 3 CCDs camcorders. If you can afford to spend more money a high quality 3CCD, standard definition miniDV camcorder will provide sharper pictures, where, normally, only expert viewers will notice the difference. The 3CCD camcorders will have other features, that are useful for expert movie makers.
Any of the well known brands of video cameras are good value.
You can archive your edited footage back onto a miniDV tape, which has a
longer life than a DVD disc that has been stored as a backup. The miniDV
tape image is slightly better quality than DVD. The miniDV tape is a proven
rugged, reliable format - it is good for 10 to 15 years when stored as an
archive, maybe more. With an iLink in/out connection, these video cameras
are easily compatible with DVD recorders and computers. The miniDV tapes
are cheap.
[Note that in Europe camcorders which can record from
an external source, like your editing system, are classified as "video recorders"
and subject to 12.5% additional tax. Many manufacturers disable the "video-in"
facility on their lower-priced camcorders to avoid the tax. Such cameras
cannot be used to record your edited work back onto miniDV tape. Jessops
offer miniDV camcorders with "video in" from about £280. Prices in mid
2007.]
If the miniDV camcorder has an AV input connection it will restore the control track on old VHS and old S-VHS video as that material is recorded onto a miniDV tape. This video will then transfer to DVD recorders and computers without dropping frames at the start of the various video clips and various other places. The audio will also stay in sync.
The normal practice is to use a computer to edit and then archive the video shots on an external hard drive.
If you don't intend to use a computer you can use a DVD recorder to copy video shots to two DVD discs. Use one DVD for regular viewing and keep the other one as a back-up. You should keep the camera tape as an archive. This is not the best option - you really need a computer.
Desirable features in a video camera
 The following is a partial extract from the information sheet
for the miniDV Canon MV 929i video camera. This will give you some idea as
to what to look for:-
The following is a partial extract from the information sheet
for the miniDV Canon MV 929i video camera. This will give you some idea as
to what to look for:-
- Standard screen 4x3 mode (the pixel count info shows there is a 4x3 mode).
- Wide screen 16x9 mode, (ideal for travel and family shots).
- Electronic image stabilizer.
- DV iLink in/out. (DV-in is essential if you are going to transfer old VHS and old S-VHS video to DVD).
- 25x optical zoom.
- Automatic/manual focus and exposure.
- Microphone input (not essential for a beginner but convenient for more advanced work.)
- AV terminal - I don't know the details - check the operator's manual to see if this includes AV input, which you will need if you are going to upgrade old video tapes to DV.
- Automatic exposure programs. (The spotlight program is handy allowing you to operate on auto exposure in slightly bright conditions.)
- There is no accessory shoe - it is not essential.
- Buy a UV (ultra-violet) filter to protect the lens. With some camcorders you will need a filter extension ring so that you can fit the lens cover over the filter.
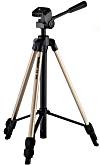 Tripods and handheld
camera work
Tripods and handheld
camera work
Tripods are useful for scenic shots when zoomed to telephoto. They are not practical for family shots - the subject won't stand around and wait while you set up the tripod - also the subject keeps moving.
There are fluid-head tripods - these have liquid damping to make panning steadier . The stiffness of the liquid damping can be adjusted on the more expensive models. There are low cost tripods that now have fluid heads - check that they are working properly before you buy. There are fluid-effect tripods - these have greased friction components - some are OK, but in extreme cold weather, they can be useless. They are very cheap.
For overseas travel, I use a Velbon CX300 tripod - it is the smallest model - it weighs one kilogram. It still costs A$63 after 10 years. [In the UK the Velbon CX300 amazon.co.uk has in mid 2007 at £27.95.] There is no fluid or grease in the head. There is a special technique for using it. Squeeze your spare hand in between the top of the tripod and the base of the camera - this hand then becomes the shock absorber on the camera movement. In strong winds press the tripod down - the static shots will be steady and you will also be able to pan and tilt smoothly. Start the camera recording and grab the handle and now control the movement in a smooth manner. Use your computer to edit out the unwanted movement at the start and end of the shot.
I also own a Manfrotto 128RC fluid-head on a 190D tripod. Total cost is now A$249. The fluid damping is non-adjustable for stiffness - but it works perfectly. I use this tripod for making dramas. [UK pricing in mid 2007 about £70 for the fluid-head and £85 for the tripod.]
Handheld video camera shots.
I am now using my 4th camcorder - with the image stabilizer always switched on. I have read that it should be switched off when the camcorder is mounted on a tripod, but I have never had a problem with leaving it switched on.
Wide-angle scenic shots and wide-angle family shots are easy.
For close-ups (CU) up to 2 metres away, brace your elbows against your chest.
For further away shots - use wider angle shots. Sitting on a chair back-to-front, helps - also try sitting on the floor - with elbows rested on knees. Bracing wrists against a wall or tree etc. is a much used method.
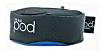 |
[In the UK an intermediate form of camcorder support called 'The Pod' is popular. In essence it is a bean-bag which can be rested on any surface - smooth or uneven - and used to steady the camera. It is about 12cm diameter and 4cm high with a standard tripod-sized screw at the top. Made in Canada it is available in mid 2007 from Jessops for £14.99. ] |
The iMac computer.
I own an iMac, it is one of the best choices. When you buy it new, it works without problems. When it gets old, it is easily repaired to good condition. Macintosh computers and their software are the choice of the movie making industry. My previous experience with computer based editing systems made it easy for me to learn the iMovie system - which is the basic Apple Software system. With the iMac you have to load the video, via an iLink cable from a digital camcorder. It won't load from a DVD recorder - it will load from the miniature "Sony DVrecorder and player". Before you buy other than a miniDV camcorder, check if it will load to the iMac.
On my iMac the "DVD Project" format is an empty shell - the movie file must be kept to make it work. But once I have changed it to a "DVD Disc Image" format, I can delete the movie file. Check this on your computer system before you delete movie files.
To archive my videos - I transfer all the edited movies back to MiniDV tapes, which also gets rid of unwanted baggage, such as unused video and the editing instructions. These MiniDV tapes will last 10 to 15 years when stored as an archive. I also make a second backup by transfering the movie from the above mentioned MiniDV tapes to a spare external hard drive.This uses 13 Gb of hard drive space for each hour of movie. An alternative second backup is to transfer the "DVD Disc Image" file (which is Read Only, but only uses about 6 Gb of hard drive space for each hour of movie) to a spare external hard drive. This is used to make replacement DVD's.
Before you buy an iMac - refer to Part 19 (Burning DVDs and Archiving) for a complete explanation of using the various DVD formats and archiving the edited DV movie (the movie has the unwanted baggage removed so that only 13 gb per hour of movie is used.) One trap is that the "Archived DVD Project" format is not suitable for our purpose, it uses 18 to 28 Gb of hard drive space for each hour of movie.
You will also need to install Microsoft Word in the iMac so that incoming attachments in Word will automatically open. It is possible to open the incoming Word files without it, but it is very messy. I type in the Apple Pages which is easy to convert to Word.
Casablanca computer editors.
I also own a Casablanca Avio - it is a computer based editing machine that works without configuration problems. It is easy to learn and a dream to use. The Casablanca editors are definitely the best system for a beginner and it is very suitable for advanced editing.
The Microsoft PC.
With computers that use the Microsoft operating system you must get expert advice on:
- your choice of computer
- the editing software
- the software to burn DVD's
- and the software to archive the DVD images to an external hard drive.
Make sure you talk to someone who is using the system that is recommended to you.
The XP operating system has the Microsoft "Movie Maker" program - I read that it works without configuration problems. It is a basic system that is suitable for a beginner.
The computer hardware.
Raw video from camera shots or a movie that is already edited, requires a space of about 13 Gb per hour of video on the hard drive. When editing, you need at least another 15 Gb space on your hard drive for each hour of movie.
Use an external hard drive for the "archived DVD disc images" - you will need about 5 Gb for each hour of video. If you are working on several projects totaling 2 to 3 hours - you will need a minimum of 60 to 100 Gb's of space, respectively, to load the video shots and edit. If you are going to load your computer up with a lot of other stuff you should consider using another external hard drive for the movie editing - but the editing software should stay on the main hard drive.
I have a 250 Gb Lacie D2 external hard drive. It was supplied already formatted
for an iMac computer. This is used to store the"archived DVD disc image".
They can also be "daisy-chained" so that you can increase your hard drive
storage.
[Hard drive capacity increases and prices decrease
steadily. In mid 2007 amazon.co.uk had 250Gb hard disks for
£46.99.]
Use "Made in Japan" DVD's - I use Maxell or Taiyo Yuden discs. You can get
a "DVD identifier" download from the internet to check where the DVD discs
are made. DVD-R are considered to be the best ones to use. I now use Taiyo
Yuden OEM grade DVD-R white inkjet printable, bulk 100 in a wrapped bundle
- they do not come in a spindle. Cost is about $61 (in October 2008) for
the 100 bundle (which includes GST and Postage to anywhere in Australia)
from PCX. The price may change: check before you buy.
(www.pcx.co.au Postal address, PCX PTY
LTD, 7 Avon Road, North Ryde, NSW, 2113. Phone 02 9878 4444.)
[In UK Taiyo Yuden White Full Face Print 8x DVD-R - Cello are £30.49
in October 2008 for a pack of 100 from
www.dvdshoponline.co.uk.]
TDK cases can be bought - for 50 cents each. You should be able to get free empty spindles from video processing shops. Total cost is A$1.25 each for the discs.
By searching on the telephone and the internet, you can find your local supplier. Maxell, "Made in Japan", are hard to find - look for the Taiyo Yuden discs.
Firewire is called IEEE 1394 by the computer industry. It does not need a computer to make it work. Apple call it firewire, Sony call it iLink.
ILink (4 pin)
This is the tiny connection you will see on DV camcorders, DVD recorders and some computers. FW400 (6 pin) is seen on some computers and external hard drives. It is used to daisy-chain external hard drives, (RAID) - there has to be a FW400 connection on the computer. FW800 (9 pin) is seen on some external hard drives - it is used by professional movie makers - not needed by home movie makers.
Typical cables connections are:-
- ILink on camcorder - to - iLink on DVD recorder. In real time.
- ILink on camcorder - to - iLink on the computer or - to - FW400 on the computer. In real time.
- ILink on DVD recorder - to - iLink on the computer or - to - FW400 on the computer. In real time.
- FW400 on computer - to - FW400 on external hard drives. At 50 Mb per second.
- FW400 and USB 2.0 have similar video transfer speeds, but the FW400 is the preferred one, as it is more reliable. The USB connection needs a computer to make it work. Use firewire for video work.
- USB can be used for stills and the video clips stored on the card.
Take care when connecting the iLink cable to equipment - a lot of connections get damaged. Look closely at the cable end and make sure you don't try to connect it back to front. Refer to the Part 17 (Theory and Practice of Editing) for further information.
< Part 1 | Introduction | Part 3 >
© copyright Arthur Bullock, 2007
Share your passions.
Share your stories.